Tuesday, July 29, 2025
curd
തൈര് വെച്ചിട്ട് എളുപ്പത്തിൽ ഉണ്ടാക്കാൻ പറ്റുന്ന കറികളുടെ റെസിപ്പി ആണ് കെട്ടോ! മടിയുള്ള ദിവസങ്ങളിൽ 5 മിനുട്ടിനുള്ളിൽ ഉണ്ടാക്കാൻ പറ്റുന്ന അടിപൊളി കറികൾ ആണെ 2 minutes curd curry 👉 Add salt to the curd and beat it without any lumps.Then add shallots and mix well. Heat coconut oil in a pan add turmeric powder,chilli powder, asafoetida powder to it and pour this into curd. 2 minutes curry ready.Potato curd curry👉 Boil potatoes, peel them, and cut into small pieces. Add salt to the curd and mix until smooth (no lumps). Add boiled potatoes, onion, coriander leaves, and chilli powder to the curd. For the tadka, heat oil and add mustard seeds, red chillies, curry leaves, turmeric powder, and chilli powder. Mix everything together, and the curry is ready!Shallots curd curry👉Heat coconut oil in a pan add shallots and saute them until translucent. Then add garlic, green chillies saute them. After that add turmeric powder, salt and TT asafoetida powder. Mix everything together and switch off the flame. Then add beaten curd and mix well. Last tampered with mustard seeds and add this to the curry.Kuthi kachiya moru 👉Crush pepper, cumin seeds, ginger. Take yogurt, add water to it, beat it without any lumps. Heat coconut oil in a pan. Splutter mustard seeds and fenugreek seeds. Then add red chillies, Curry leaves and Crushed ingredients, saute it. Then add beaten yogurt, salt and mix well, switch off the flame. Do not boil it.....Follow easy_cooking_island for more recipes ...#curd #curdrecipes #easyrecipes #5minutesrecipes
Monday, July 28, 2025
ബട്ടേളപ്പം/ബട്ടിലപ്പം
*ബട്ടേളപ്പം/ബട്ടിലപ്പം കേട്ടിട്ടുണ്ടോ ഇതുപോലൊരു പലഹാരം എന്നാൽ ഈ പേരിൽ അറിയപ്പെടുന്ന ഒരു ലക്ഷദ്വീപ് സ്പെഷ്യൽ നാലുമണി പലഹാരം ആണ് ബട്ടേളപ്പം . ദ്വീപിലെ സ്പെഷ്യൽ പരിപാടികളിൽ ഒക്കെ തയ്യാറാക്കുന്ന ഒരു കിടിലൻ വിഭവമാണ് വളരെ കുറഞ്ഞ ചേരുവ മാത്രമേ ഇതിനുള്ളൂ ട്ടോ*

ചേരുവകൾ:-
1-മുട്ട - 5 എണ്ണം
2-പഞ്ചസാര - 5 ടേബിൾസ്പൂൺ
3 -ഏലയ്ക്കാപ്പൊടി - 1/4 ടീസ്പൂൺ
4-മഞ്ഞ ഫുഡ് കളർ- ഒന്നോ രണ്ടോ നുള്ള്
5-നെയ്യ് - ഒട്ടിപ്പിടിക്കാതിരിക്കാൻ ആവശ്യമുള്ളത്
6-കിസ്മിസ്
തയ്യാറാക്കുന്ന വിധം:-
1️⃣ മുട്ട ഒരു ബൗളിലേക്ക് പൊട്ടിച്ചൊഴിക്കുക
2️⃣ അഞ്ചു മുട്ടയിലേക്ക് 5 ടേബിൾ സ്പൂൺ പഞ്ചസാരയും ചേർക്കുക
3️⃣ ഏലക്കാപൊടിയും മഞ്ഞ ഫുഡ് കളറും ചേർത്ത് കൈകൊണ്ട് നന്നായി യോജിപ്പിച്ച് എടുക്കുക . ഒരിക്കലും മുട്ട പതഞ്ഞു പോകരുത് അതുകൊണ്ട് ഒന്നെങ്കിൽ നിങ്ങൾ കൈ വെച്ചിട്ടോ അതല്ലെങ്കിൽ ചെറിയ സ്പൂൺ വച്ചിട്ട് പതഞ്ഞു പൊങ്ങാത്ത രീതിയിൽ വേണം ഇത് യോജിപ്പിച്ചെടുക്കാൻ
4️⃣ പഞ്ചസാരയും മുട്ടയും നന്നായി യോജിച്ചു കഴിഞ്ഞാൽ ഇതൊരു അരിപ്പയിൽ കൂടി അരിച്ചെടുക്കുക
5️⃣ ബട്ടേലപ്പം തയ്യാറാക്കുന്നത് ഇഡലി പാത്രത്തിലാണ്. അതുകൊണ്ട് തന്നെ ഇഡലി തട്ട് നെയ്യ് ഒന്ന് പുരട്ടി വെക്കുക
7️⃣ ഒരു സമയത്ത് ഒരു ഇഡലിത്തട്ടിൽ മാത്രം വച്ചിട്ടാണ് നമ്മൾ ഇത് വേവിച്ചെടുക്കുന്നത്. കാരണം താഴെ തട്ട് വെച്ച് വേവിച്ചാൽ അതിലേക്ക് വെള്ളം ഇറങ്ങും ഇതിൽ അങ്ങനെ വരാൻ പാടില്ല. മാത്രവുമല്ല നമ്മൾ ഇത് മുഴുവനായി അടച്ചിട്ട് വേവിക്കരുത് അടപ്പ് കുറച്ച് തുറന്നിട്ടിട്ട് വേണം വേവിച്ച് കൊടുക്കാൻ ഇതും വെള്ളം ഇതിലേക്ക് ഇറങ്ങാതിരിക്കാൻ വേണ്ടിയിട്ടാണ് ഇങ്ങനെ ചെയ്യുന്നത്
8️⃣ ഇഡലിത്തട്ട് അടുപ്പിൽ വെച്ച് ആവി കയറ്റി എടുക്കുക ഇത് പകുതി വേവ് ആവുമ്പോൾ ഓരോന്നിന്റെ മുകളിലും ഓരോ കിസ്മിസ് വീതം വെച്ചു കൊടുക്കുക
9️⃣ മുഴുവനായി വെന്ത് കഴിഞ്ഞാൽ ചൂടാറിയതിനു ശേഷം സ്പൂൺ ഉപയോഗിച്ച് എടുക്കാം. വളരെ കുറഞ്ഞ ചേരുവ കൊണ്ട് കിടിലൻ രുചി കിട്ടുന്ന ഒരു പലഹാരമാണ് എല്ലാവരും തയ്യാറാക്കി നോക്കുക
Edible Flowers
🌸 Edible Flowers to Grow in Your Forage Garden 🌿💐

🌹 Classic & Fragrant:
Rose – Petals are perfect for jams, syrups, and desserts.
Lavender – Lovely in teas, baked goods, and savory dishes.
Carnation – Spicy-sweet petals, ideal for decorating cakes.
🌼 Bright & Bold:
Marigold – Slightly citrusy, great in rice or salads.
Sunflower – Young petals and buds are edible; seeds too!
Dandelion – Use the entire plant: petals, greens, and roots.
🌿 Fresh & Peppery:
Nasturtium – Spicy, peppery flavor; edible flowers and leaves.
Daylily – Mildly sweet and crunchy; great in stir-fries.
💜 Sweet & Delicate:
Lilac – Subtle floral flavor, beautiful in syrups.
Violet – Great for candies, jellies, or herbal infusions.
Pansy – Mild flavor, perfect for garnishes and salads.
🍽️ Bonus:
Squash Blossom – A culinary favorite! Stuff and fry or toss into soups.
🌼 Bloom, Harvest, Eat!
Growing edible flowers turns your garden into a living pantry! Just be sure to use pesticide-free blooms.
avoid
🌿 Avoid pairing these plants to prevent stunted growth, pest issues, or competition for nutrients.

• Corn and tomatoes attract the same pests, like corn earworms.
• Peppers and cabbage can slow each other’s growth due to incompatible soil needs.
• Sage inhibits cucumber development.
• Potatoes and zucchini both demand heavy nutrients and space—leading to overcrowding.
• Carrots and parsnips compete underground, reducing yields.
• Beans release compounds that can harm onions.
• Fennel disrupts eggplant root development.
Plant smart to keep your garden thriving!
Fastest Growing Fruit Trees for a Thriving Orchard
🍑 Fastest Growing Fruit Trees for a Thriving Orchard

Want fruit sooner than later, These trees and bushes grow fast and deliver quick harvests! 🍓✨
• Blackberry Bush – Harvest in 1–2 years (Zones 5–8)
• Passion Fruit – Ready in 18 months (Zones 9b–11)
• Strawberries – Fruit in 4 months! (Zones 5–10)
• Dwarf Cavendish Banana – Pick bananas in under 2 years (Zones 4–11)
• Pear Tree – Sweet fruit in 2 years (Zones 3–8)
• Blueberry Bush – Berries in ~2 years (Zones 4–11)
• Apricot Tree – First harvest in 2–4 years (Zones 4–9)
• Peach Tree – Juicy peaches in 2 years (Zones 5–9)
• Dwarf Apple Tree – Compact + productive in 2–3 years
• Fig Tree – Fast-growing & fruitful in 2–3 years (Zones 5–11)
• Meyer Lemon – Indoor/outdoor, starts in a few years
• Raspberry Bush – Fruit in 2 years (pH 6–7 soil)
• Mulberry Tree – Berries in just a couple of years 🌿
💡 Tip: Full sun + well-drained soil = faster, healthier growth!
Sunday, July 27, 2025
steam cake
15 minutes ragi steam cake (Ingredients in the description box)
Cake ingredients
1/2 cup Ragi flour
1/2 cup jaggery powder
3 tbsp cocoa powder
3 tbsp oil
1/2 tsp baking soda
1/4 tsp vanilla essence
1/2 cup milk (Room temperature)
Toppings
Dark chocolates , cubes or chocolate chips
Walnuts, chopped , mix seeds etc
Method
Take a bowl. Mix all the cake ingredients. Make smooth consistency batter.
Take few drops of oil and Grease the steel ki katori .
fill half the katori with cake batter.
Sprinkle some dark chocolates, walnuts etc
Preheat the steamer and steam the cake for 15-20 minutes at high flame..
Serve hot or cold..
pedogenic process
The pedogenic process refers to the sequence of physical, chemical, and biological processes that lead to the formation and development of soil. These processes act on parent material (rock or sediment) over time to produce distinct soil horizons (layers). The main stages of pedogenesis include:

1. Weathering of Parent Material:
Physical and chemical breakdown of rocks into smaller particles. This forms the mineral base of the soil.
2. Organic Matter Accumulation:
Plants and animals contribute organic material. Microorganisms decompose this material into humus, enriching the topsoil.
3. Leaching (Eluviation):
Water percolates through soil, dissolving and carrying away minerals and nutrients from upper horizons.
4. Accumulation (Illuviation):
Minerals and organic matter from upper layers are deposited in lower layers, forming distinct horizons rich in clay, iron, or organic compounds.
5. Clay Formation:
Secondary minerals such as clays form through weathering and contribute to soil structure.
6. Oxidation and Reduction:
Changes in redox conditions (due to water saturation or aeration) alter soil color and chemistry, particularly involving iron and manganese.
7. Soil Horizon Development:
Over time, these processes create layers:
O Horizon (organic matter)
A Horizon (topsoil)
E Horizon (leached zone, if present)
B Horizon (subsoil accumulation)
C Horizon (weathered parent material)
R Horizon (bedrock)
The type and intensity of these processes depend on climate, organisms, relief, parent material, and time—known as the five soil-forming factors.
~NGA AgroClimate Tech
drinks
🥤 4 Powerful Morning Drinks to Boost Your Health Naturally

Start your day with energy, clarity, and glow—naturally!
✨ 1. Alkaline Water
Ingredients:
🥒 1 Cucumber
🍋 1 Lemon
💧 1 Liter Water
Benefits:
Balances pH 💚
Detoxes your system
Hydrates + improves digestion
Boosts immunity 🌿
✨ 2. Chia Water
Ingredients:
💧 Water
🌱 Soaked Chia Seeds
Benefits:
High in fiber 💪
Great for digestion + glowing skin
Supports weight loss
Packed with antioxidants ✨
✨ 3. Turmeric Water
Ingredients:
💧 Water
🌼 Turmeric (fresh or powdered)
Benefits:
Fights inflammation
Relieves cold + pain 🤧
Boosts healing + immunity
Clears up your skin 🌟
✨ 4. Electrolyte Water
Ingredients:
🥥 1 cup Coconut Water
🍈 1/4 cup Lime Juice
🧂 Pinch of Pink Salt
Benefits:
Rehydrates + restores minerals
Great post-workout drink 💦
Rich in potassium + vitamin C
Supports energy + balance ⚡
🌞 Morning Glow Tip:
One simple drink = Better skin, digestion, and immunity.
💧 Drink up, feel great, repeat daily!
Wednesday, July 23, 2025
foods
Healthy foods are essential to provide the nutrients the body needs to function properly and stay in optimal condition. Here we share some delicious and nutritious recipes:

1. Spinach Salad with Fruits and Nuts: A mix of fresh spinach, fruits like apples and bananas, and nuts like almonds and macadamias.
2. Grilled Salmon with Vegetables: Fresh roasted salmon accompanied by vegetables such as broccoli, carrots and cucumbers.
3. Quinoa with Legumes and Vegetables: Cooked quinoa combined with legumes such as lentils and chickpeas, as well as vegetables such as onion, garlic and peppers.
4. Fruit and Vegetable Smoothie: A delicious smoothie that includes strawberries, bananas and apples along with spinach and kale.
5. Baked Chicken with Potatoes and Vegetables: Fresh baked chicken served with potatoes and vegetables such as carrots, broccoli and onion.
Additionally, here is a list of foods that are ideal for a balanced diet:
1. Fruits: apples, bananas, strawberries, oranges and mango.
2. Vegetables: spinach, broccoli, carrots, cucumbers and tomatoes.
3. Proteins: salmon, chicken, eggs, legumes and nuts.
4. Grains: quinoa, brown rice, oats, whole wheat bread and whole grain cereals.
5. Dairy: milk, yogurt, cheese and butter.
6. Oils: olive oil, coconut oil and linseed oil.
7. Herbs and Spices: garlic, onion, pepper, coriander and cumin.
Incorporate these foods into your daily diet to stay healthy! 🥗🍏🐟🥦
sex identification
🐣 Chick Sexing by Feather Shape


A practical, non-invasive method for early identification:
• Female chicks: Primary feathers grow faster than covert feathers
• Male chicks: Primary and covert feathers grow at similar lengths
• Works best on certain fast-feathering breeds
• Observe feather curve—females show a two-step shape, males a single curve
• Ideal during the first few days after hatching
• Useful for small-scale backyard flocks and breeders alike
friends of tomatoes
Tomatoes + these 9 plants = less pests, more harvest 🌱🍅

• Basil – Boosts flavor & repels pests
• Marigolds – Deters nematodes & aphids
• Chives – Repels aphids and improves growth
• Borage – Attracts pollinators, deters tomato hornworms
• Garlic – Natural pest control for spider mites & more
• Parsley – Attracts beneficial predatory insects
• Lettuce – Provides ground cover & moisture retention
• Carrots – Utilize root space efficiently
• Nasturtiums – Trap crop for aphids & whiteflies
✅ Companion planting reduces pests, saves space, and boosts your tomato yield!
വീട്ടിൽ മല്ലിയില കൃഷി
വീട്ടിൽ മല്ലിയില കൃഷി

✅ ആവശ്യമായ വസ്തുക്കൾ:
മല്ലി വിത്തുകൾ (വേഗത്തിൽ മുളയ്ക്കുന്നതിന് വിത്തുകൾ പിളർത്തുക)അടുത്തുള്ള അഗ്രിഫാർമിൽ നിന്നോ വീട്ടിലെ മല്ലിയോ എടുക്കാം
ചട്ടി അല്ലെങ്കിൽ ഗ്രോ ബാഗ് (കുറഞ്ഞത് 6 ഇഞ്ച് ആഴത്തിൽ)
അയഞ്ഞതും നീർവാർച്ചയുള്ളതുമായ മണ്ണ് (കമ്പോസ്റ്റ്/മണ്ണിര കമ്പോസ്റ്റുമായി കലർത്തി)
വെള്ളം സ്പ്രേ ബോട്ടിൽ അല്ലെങ്കിൽ ക്യാൻ
വെയിൽ ലഭിക്കുന്ന സ്ഥലം (3–5 മണിക്കൂർ സൂര്യപ്രകാശം ലഭിക്കണം)
🪴 ഘട്ടം ഘട്ടമായുള്ള കൃഷി ഗൈഡ്:
സ്ഥലം തിരഞ്ഞെടുക്കുക:
ബാൽക്കണിയിലോ ടെറസിലോ നിങ്ങളുടെ പിൻമുറ്റത്തോ ചട്ടി/ഗ്രോ ബാഗുകൾ സ്ഥാപിക്കുക.
മണ്ണ് മിശ്രിതം തയ്യാറാക്കുക:
1:1:1 അനുപാതത്തിൽ മണ്ണ് + കമ്പോസ്റ്റ്(തേയില, ചകിരി, മണ്ണിര കമ്പോസ്റ്റു ) + മണൽ എന്നിവ കലർത്തുക.
മികച്ച ഇല വളർച്ചയ്ക്ക് മണ്ണിര കമ്പോസ്റ്റ് അല്ലെങ്കിൽ ഉണങ്ങിയ കോഴിവളം ചേർക്കുക.
വിത്തുകൾ വിതയ്ക്കുക:
വിത്തുകൾ ചെറുതായി ചതച്ച് (രണ്ടായി പിളർത്തുക).
മല്ലി ഒരു ന്യൂസ് പേപ്പറിലോ തുണിയിലോ വച്ച് ചപ്പാത്തി പരത്തുന്ന പലക അതിനു മുകളിലൂടെ മൃദുവായി അമർത്തിയാൽ പിളർന്നു കിട്ടും
3–4 മണിക്കൂർ കുതിർക്കുക.
0.5 സെന്റീമീറ്റർ ആഴത്തിൽ വിതച്ച് മണ്ണിൽ ചെറുതായി മൂടുക.
വിത്തുകൾക്കിടയിൽ 1–2 സെന്റീമീറ്റർ അകലം പാലിക്കുക.
നനവ്:
മണ്ണ് ഈർപ്പമുള്ളതായി നിലനിർത്താൻ എല്ലാ ദിവസവും രാവിലെ സ്പ്രേയർ ഉപയോഗിച്ച് നനയ്ക്കുക, പക്ഷേ ഒരുപാടു വെള്ളം ആവശ്യമില്ല
വേരുകൾ ചീയുന്നത് തടയാൻ വെള്ളം കെട്ടിനിൽക്കുന്നത് ഒഴിവാക്കുക.
സൂര്യപ്രകാശം:
വെയിൽ അല്ലെങ്കിൽ അർദ്ധ തണൽ ലഭിക്കുന്ന സ്ഥലത്ത് വയ്ക്കുക.
3–5 മണിക്കൂർ പരോക്ഷ സൂര്യപ്രകാശം അനുയോജ്യമാണ്.
പരിചരണം:
തൈകൾ തിങ്ങിനിറഞ്ഞാൽ ആരോഗ്യം നഷ്ടപെട്ടുപോകും
ഓരോ രണ്ടാഴ്ച കൂടുമ്പോഴും ജൈവ ദ്രാവക കമ്പോസ്റ്റ് (ഉപയോഗിച്ച തേയില നല്ലതാണു ) ഉപയോഗിച്ച് വളപ്രയോഗം നടത്തുക.
വിളവെടുപ്പ്:
25–30 ദിവസത്തിനുള്ളിൽ ഇലകൾ വിളവെടുക്കുക.
വീണ്ടും വളരാൻ അനുവദിക്കുന്നതിന് മണ്ണിൽ നിന്ന് 1 ഇഞ്ച് മുകളിൽ മുറിക്കുക.
വീണ്ടും നടുന്നത് വരെ വേരോടെ പിഴുതെറിയുന്നത് ഒഴിവാക്കുക.
🌿 ബോണസ് ടിപ്പുകൾ:
തുടർച്ചയായ വിതയ്ക്കൽ: തുടർച്ചയായ വിളവെടുപ്പിനായി ഓരോ 10–15 ദിവസത്തിലും പുതിയ വിത്തുകൾ വിതയ്ക്കുക.
നിലവിലുള്ള മല്ലിച്ചെടികളുടെ അരികിൽ മല്ലി വളർത്തുന്നത് മികച്ച പരാഗണത്തെ പിന്തുണയ്ക്കുകയും പച്ചപ്പ് നിറഞ്ഞ വളർച്ചയെ പ്രോത്സാഹിപ്പിക്കുകയും ചെയ്യുന്നു.
ഈർപ്പം നിലനിർത്താനും മണ്ണ് തണുപ്പായി നിലനിർത്താനും പുതയിടൽ (ഉണങ്ങിയ ഇലകൾ അല്ലെങ്കിൽ തേങ്ങയുടെ തൊണ്ട് പോലുള്ളവ)
ഉപയോഗിക്കുക.
#HomeGardening #kitchengarden #corianderleaves #krishinews #agriculture #farming #krishitips
Tuesday, July 22, 2025
Organic farming
Organic farming vs traditional farming: What is the real difference?

As the demand for sustainable food systems increase, the debate between organic (organic) farming and traditional farming is intensifying. Let's understand the main difference between the two:
1. Farming Practices (Farming Practices)
🔸 Organic farming:
Based on natural methods, like -
Crop rotation
Organic fertilizer and composting
Biological pest control (biological pest control)
🔸 Traditional farming:
Heavy amounts of chemical fertilizers, pesticides and
GMOs (Genetically Modified Organisms) are used.
2. Quality of Soil (Soil Health)
🔸 Organic farming:
Increases the fertility of soil slowly and sustainably.
Biodiversity and organic substances are used.
🔸 Traditional farming:
Excessive use of chemicals can harm the quality of soil and organic life.
3. Food Quality (Food Quality)
🔸 Organic Products:
Considered more safe because these contain less residue of pesticides.
🔸 Traditional Products:
Production is high but chemical residue can be found.
4. Impact on Environmental Impact)
🔸 Organic farming:
Carbon emissions are low
Safe for bees and water sources
🔸 Traditional farming:
Production is higher per acre
But pollution and environmental damage are more
5. Economic Considerations
🔸 Organic farming:
Prices are high in the market
But the production costs also higher
🔸 Traditional farming:
Cost goes down and subsidies are received from the government.
But it depends on chemicals and external resources
Conclusion (Conclusion):
If you prioritize environment and health, organic farming is a sustainable option. But if high production and low cost are main objectives, traditional farming can be effective.
👉 Decision depends on the farmer's priorities, resources and market demand.
(Sakshi Singh)
Team ABKKSS
Saturday, July 19, 2025
egg shells
Never plant tomatoes without it: You will have a harvest 3 times larger and big tomatoes
Growing tomatoes is a rewarding experience, but achieving large fruits and an abundant harvest can sometimes be challenging. One simple, cost-effective way to improve your tomato plants is by using eggshells. Here’s how eggshells can benefit your tomato plants and how to use them effectively.
Benefits of Using Eggshells
Calcium Source: Eggshells are rich in calcium, an essential nutrient for tomato plants. Calcium helps prevent blossom end rot, a common issue in tomatoes where the bottom of the fruit turns black and rots.
Soil Aeration: Crushed eggshells improve soil structure and aeration, allowing roots to grow more efficiently and absorb nutrients better.
Pest Deterrent: Sharp eggshell pieces can deter soft-bodied pests like slugs and snails, protecting your plants from damage.
Natural Fertilizer: As eggshells break down, they release essential minerals into the soil, acting as a slow-release fertilizer.
How to Prepare Eggshells for Your Garden
Collect and Clean: Save eggshells from your kitchen. Rinse them thoroughly to remove any egg residue and let them dry completely.
Crush: Once dried, crush the eggshells into small pieces. You can use your hands, a rolling pin, or a food processor for a finer consistency.
Store: Store the crushed eggshells in a container until you’re ready to use them in your garden.
How to Use Eggshells in Your Tomato Garden
Planting: When planting tomato seedlings, sprinkle a handful of crushed eggshells into each planting hole. This provides a direct source of calcium to the young plants.
Top Dressing: Scatter crushed eggshells around the base of established tomato plants. As they decompose, they will slowly release calcium into the soil.
Compost: Add eggshells to your compost pile. They will break down over time, enriching your compost with calcium and other minerals.
Liquid Fertilizer: For a quick calcium boost, soak crushed eggshells in water for a few days to create a liquid fertilizer. Use this water to irrigate your tomato plants.
Tips for Using Eggshells
Consistent Application: Regularly apply eggshells throughout the growing season to maintain soil calcium levels.
Combine with Other Amendments: Eggshells work well with other organic amendments like compost and well-rotted manure.
Monitor Soil pH: While eggshells can help neutralize acidic soil, it’s essential to monitor your soil’s pH to ensure optimal growing conditions for tomatoes.
Conclusion
Using eggshells in your tomato garden is an easy and sustainable way to boost plant health and increase your yield. By providing a steady source of calcium and improving soil structure, eggshells help your tomato plants thrive. Give this simple technique a try and enjoy larger, healthier, and more abundant tomatoes this season!
Visual Guide
Here are some images to guide you through the process:
Collecting and Cleaning Eggshells:
Crushing Eggshells:
Using Eggshells in the Garden:
Top Dressing with Eggshells:
Try this natural approach, and watch your tomato plants flourish!
12 Anti-Cancer Foods
🍏 Top 12 Anti-Cancer Foods You Should Add to Your Diet Today! 🥗

🍈 1. Soursop
Packed with antioxidants, soursop is often praised for its potential anti-cancer properties. Enjoy it in smoothies or as a refreshing treat.
🍎 2. Pomegranate
Rich in vitamin C and antioxidants, pomegranate helps fight cancer by protecting cells from free radicals.
🥭 3. Mangosteen
Known as the "queen of fruits," mangosteen is full of xanthones, which have anti-inflammatory and anti-cancer properties.
🍅 4. Tomatoes
High in lycopene, tomatoes help lower the risk of prostate cancer. Eat them fresh, cooked, or in your favorite sauce!
🧄 5. Garlic
Garlic is a superfood that boosts your immune system and helps reduce cancer risk, especially in digestive tract cancers.
🌿 6. Turmeric
With its active compound curcumin, turmeric helps prevent inflammation and supports the fight against cancer.
🍇 7. Grapes
Loaded with resveratrol, grapes have been shown to reduce cancer risk and improve overall health.
🫐 8. Blueberries
These tiny berries are packed with antioxidants and have been shown to help prevent cell damage linked to cancer.
🥦 9. Broccoli
Broccoli is a powerhouse of cancer-fighting compounds, especially sulforaphane, which helps detoxify the body.
🥬 10. Cauliflower
Like broccoli, cauliflower contains similar cancer-fighting nutrients, making it an excellent addition to your diet.
🥬 11. Kale
Kale is a nutrient-rich vegetable with antioxidants that can help prevent cancer and support overall health.
🍈 12. Noni
Noni, a tropical fruit, contains compounds that may have anti-cancer effects and can improve overall well-being.
age
Types of Women Who Age Very Quickly

1. Women who are constantly stressed: cortisol accelerates aging.
2. Women who sleep less than 6 hours: poor sleep deteriorates the body.
3. Women who completely avoid sunlight: low vitamin D damages the skin and bones.
4. Women who consume too much sugar: sugar damages collagen and causes wrinkles.
5. Women who rarely exercise: no movement = faster aging inside and out.
6. Women who hold grudges: their emotional burden is reflected in their face and health.
Agriculture
Six Core Principles for Regenerative Agriculture—and Why Farmers Should Care
Modern agriculture is at a crossroads. Soaring input costs, declining soil fertility, and unpredictable weather are squeezing farmers’ profits and threatening long-term sustainability. Fortunately, the solution isn’t merely high-tech or prohibitively expensive. It’s rooted in time-tested wisdom, now backed by rigorous science. Here are six powerful principles that can transform farms—reducing costs, building resilience, and preserving profitability for generations to come.
---
1. No Soil Movement, No Tillage
What it means:
Tillage—ploughing, disking, harrowing—physically breaks and turns over soil. “No-till” farming avoids or dramatically reduces such disturbance, leaving the soil structure intact.
Benefits for farmers:
Moisture Conservation: Unbroken soil retains more water—a lifesaver in drought-prone regions.
Cost Savings: Less fuel, fewer tractor hours, reduced machinery wear.
Soil Life Flourishes: Fungi, bacteria, earthworms thrive undisturbed, enhancing nutrient cycling and natural fertility.
Erosion Control: Bare, tilled fields are prone to erosion. No-till preserves precious topsoil.
Tillage often feels like “doing something productive.” But in reality, it’s frequently a net loss—burning money, moisture, and soil health for short-term weed control that can be achieved other ways.
---
2. Always Have Living or Dead Roots in the Soil
What it means:
Either crops are growing, or residues from previous crops remain in place. Roots—living or decaying—anchor soil, feed microbes, and improve structure.
Benefits for farmers:
Soil Carbon Storage: Roots push carbon deeper, enhancing organic matter.
Soil Structure: Dead roots leave channels for air and water infiltration.
Reduced Compaction: Constant biological activity prevents hardpan formation.
Continuous Soil Biology: Soil microbes rely on root exudates for food. No roots = biological starvation.
Bare soil is dead soil. Keep roots in the ground and the soil remains alive and productive.
---
3. Always Keep Soil Covered
What it means:
Never leave the soil surface exposed to direct sun, rain, or wind. Cover it with crops, crop residues, mulch, or cover crops.
Benefits for farmers:
Reduced Water Loss: Bare soil bakes and dries out quickly. A cover keeps soil cool and moist.
Weed Suppression: Mulch and crop residues block sunlight, hindering weed germination.
Protection from Erosion: Wind and rain can’t strip away covered soil.
Soil Fertility: Mulched organic matter decomposes slowly, releasing nutrients over time.
Soil cover is armor. Naked soil is vulnerable to every enemy: heat, wind, rain, pests, and erosion.
---
4. Have Biodiversity
What it means:
Diversity of crops, cover crops, soil organisms, beneficial insects, and animals. Monocultures invite disease and pest outbreaks. Diversity builds resilience.
Benefits for farmers:
Pest & Disease Control: Diverse crops break pest and disease cycles, reducing chemical needs.
Risk Mitigation: One crop fails? Others may succeed.
Soil Health: Different root systems extract nutrients from varying soil layers.
Pollinator Habitat: Beneficial insects thrive, improving yields.
Biodiversity isn’t just for environmentalists. It’s a business strategy for reducing risk and increasing yield stability.
---
5. Use Animal Manure and Liquid Fertilizers Made From “Trash”
What it means:
Instead of relying purely on chemical fertilizers, integrate natural fertilizers like:
Animal manure
Fermented liquids from waste fish, chicken droppings, leftover food, buttermilk
Compost teas
Benefits for farmers:
Lower Fertilizer Costs: Farm waste and local resources replace expensive chemical inputs.
Nutrient-Rich Soil: Organic fertilizers deliver a broader spectrum of nutrients—not just NPK.
Improved Soil Biology: Microbes thrive on organic matter, improving nutrient availability and plant health.
Circular Economy: Turning waste into fertilizer closes the loop, reducing pollution and saving money.
Trash isn’t trash—it’s fertilizer waiting to happen.
---
6. Stop Use of Chemical Fertilizers
What it means:
Reducing—or eliminating—synthetic nitrogen, phosphorus, and potassium fertilizers.
Benefits for farmers:
Cost Savings: Chemical fertilizers are increasingly expensive and volatile in price.
Soil Life Protection: Harsh salts and synthetic chemicals harm beneficial soil microbes.
Long-Term Fertility: Over-reliance on chemicals depletes soil organic matter and causes hidden yield declines over time.
Environmental Stewardship: Reduced chemical runoff protects rivers, groundwater, and biodiversity.
Chemical fertilizers might look cheap upfront. Long-term, they bleed the soil dry, leaving farmers dependent and trapped.
---
The Bottom Line
These six principles aren’t radical—they’re rational. They make business sense. They save money, reduce input dependence, build healthy soils, and protect the environment. In an age of volatile markets and changing climate, these practices aren’t optional luxuries—they’re survival strategies.
Farmers who adopt them stand to gain:
Lower production costs
Higher soil fertility
Better moisture retention
More resilient crops
Healthier ecosystems
Regenerative practices mean freedom from the chemical treadmill—and a future where farming remains profitable and sustainable. It’s time to farm smarter, not harder.
🧄✨ Natural Garlic + Cinnamon Spray ✨🌿
Ingredients:
- (2 cups) 500ml water
- 2 crushed garlic cloves
- 1 pinch ground cinnamon
Why It Works:
Garlic repels pests and fungi, while cinnamon heals plant wounds.
Instructions:
1. Mix crushed garlic and cinnamon in water.
2. Let sit for 30 mins, then strain into a spray bottle (no metal!).
How to Use:
- Spray leaves, stems, and undersides.
- Safe for flowers, fruits, and soil too!
Thursday, July 17, 2025
women health
🌿 9 Powerful Herbs for Women’s Health 🌸✨

Support your body naturally with these amazing herbs:
- Shatavari → balances hormones
- Vitex → eases PMS
- Red Raspberry Leaf → soothes cramps
- Dong Quai → supports menstrual health
- Black Cohosh → calms hot flashes
- Maca Root → boosts energy & libido
- Evening Primrose → nourishes skin & hormones
- Nettle Leaf → reduces inflammation
- Calendula → heals skin, supports postpartum care
💡 Stay consistent + check with your doctor before use! 🌿💕
liquid fertilizer
A powerful, budget-friendly way to supercharge growth with just 3 ingredients!

You’ll Need:
• ¼ cup sugar (white or brown)
• 1 packet (¾ oz) dry yeast
• 1.5–2 gallons lukewarm water
How to Make It:
1️⃣ Mix sugar + yeast in a large bucket
2️⃣ Add water and stir well
3️⃣ Let sit for 2 hours
4️⃣ Stir again—it’s ready!
How to Use:
Water at the base of plants
Apply 2–3 times during the growing season
Best for:
• Tomatoes 🍅
• Peppers 🌶️
• Cucumbers 🥒
• Squash, zucchini, eggplant
• Flowering plants 🌸
• Any plant needing a growth boost!
✨ Why It Works:
• Stimulates blooming & fruiting
• Boosts root growth and foliage
• Adds B vitamins & helpful microbes
• Improves overall plant health naturally
💡 Tip: Apply in warm weather. Works with fresh or dry yeast.
#gardeningtips #plantingtips #organicfertilizer #Canaan #trendingpost #viralpost #highlightsシ゚ #fypシ #explore #foryouシ
herbs
🌿 Grow Fresh Herbs Right on Your Kitchen Counter — No Soil Needed! 💧

🌱 Mint – Super easy to grow and perfect for teas, salads, or garnishes. Refreshing and fast-growing!
🌱 Parsley – Brightens up soups, sauces, and stews. Trim regularly to encourage growth.
🌱 Rosemary – Woody herb that thrives with sunlight. Use in roasts, breads, and more!
🌱 Oregano – A must-have for Italian and Mediterranean dishes. Loves a sunny windowsill.
🌱 Green Onion – Place the white bulbs in water, and you’ll have a constant supply of greens!
🌱 Thyme – Delicate and flavorful. Ideal for meats, veggies, and herbal infusions.
🪴 How-To:
1️⃣ Place cuttings in a glass jar filled with clean water.
2️⃣ Change the water every 2–3 days.
3️⃣ Keep on a sunny windowsill.
4️⃣ Trim and enjoy fresh herbs whenever you cook!
indoor plants
☀️ Light levels matter more than most think.
Some plants thrive under full sun, others fade.
Know your space, and match it to the plant’s needs.
🪟 Use east-facing windows for bright indirect light.
🪴 Rotate pots every 1–2 weeks for even growth.
💧 Light levels affect watering—less light, less water.
🌿 Group shade-loving plants together to boost humidity.
This is how indoor plants stay happy, strong, and resilient.
L
copper
Why You Should Start Drinking Water from Copper Cups! 🥤✨

🦠 Kills Harmful Bacteria
Copper has strong antimicrobial properties that help purify water naturally.
🧠 Stimulates Brain Function
It enhances brain connectivity and helps your mind stay sharp and alert.
🦋 Supports Thyroid Function
Copper plays a key role in balancing the thyroid gland — important for energy and metabolism.
🦴 Soothes Joint & Arthritis Pain
Its anti-inflammatory properties may help reduce pain and swelling in joints.
✨ Boosts Skin Health
Copper supports collagen production — leading to clearer, glowing skin.
⏳ Slows Aging
Fights free radicals and oxidative stress — one of the root causes of aging.
🌿 Improves Digestion
Copper helps stimulate digestive enzymes and detoxify the stomach.
💉 Fights Anemia
It helps the body absorb iron, crucial for preventing and managing anemia.
❤️ Lowers Risk of Cancer & Heart Disease
Copper’s antioxidant action helps protect cells and reduce harmful buildup in arteries.
💧 How to Use Copper Cups Properly:
Fill the cup with water and let it sit overnight (6–8 hours).
Drink it first thing in the morning on an empty stomach.
Do not store anything acidic (like citrus juices) in copper — it can be reactive.
Clean the cup regularly with lemon and salt to avoid oxidation.
🌟 Final Tip:
Balance is key! Copper is a trace mineral — you only need a little. Drink from copper cups 2–3 times a week to enjoy the benefits without overdoing it.
copper
Why You Should Start Drinking Water from Copper Cups! 🥤✨
🦠 Kills Harmful Bacteria
Copper has strong antimicrobial properties that help purify water naturally.
🧠 Stimulates Brain Function
It enhances brain connectivity and helps your mind stay sharp and alert.
🦋 Supports Thyroid Function
Copper plays a key role in balancing the thyroid gland — important for energy and metabolism.
🦴 Soothes Joint & Arthritis Pain
Its anti-inflammatory properties may help reduce pain and swelling in joints.
✨ Boosts Skin Health
Copper supports collagen production — leading to clearer, glowing skin.
⏳ Slows Aging
Fights free radicals and oxidative stress — one of the root causes of aging.
🌿 Improves Digestion
Copper helps stimulate digestive enzymes and detoxify the stomach.
💉 Fights Anemia
It helps the body absorb iron, crucial for preventing and managing anemia.
❤️ Lowers Risk of Cancer & Heart Disease
Copper’s antioxidant action helps protect cells and reduce harmful buildup in arteries.
💧 How to Use Copper Cups Properly:
Fill the cup with water and let it sit overnight (6–8 hours).
Drink it first thing in the morning on an empty stomach.
Do not store anything acidic (like citrus juices) in copper — it can be reactive.
Clean the cup regularly with lemon and salt to avoid oxidation.
🌟 Final Tip:
Balance is key! Copper is a trace mineral — you only need a little. Drink from copper cups 2–3 times a week to enjoy the benefits without overdoing it.
signs your plant needs help
Visual signs your plant needs help 👁️🌱

💧 Lack of water → dry leaves, yellow edges, brittle
☀️ Lack of shade → burned, yellowish leaves
🌥️ Lack of sunlight → pale leaves, weak stems
🌊 Excess water → yellow leaves, rotten roots
🍄 Fungal issues → spots, mold on leaves
🐛 Insects → holey leaves, presence of pests
Observe, care for, strengthen🌿
signs your plant needs help
Visual signs your plant needs help 👁️🌱
💧 Lack of water → dry leaves, yellow edges, brittle
☀️ Lack of shade → burned, yellowish leaves
🌥️ Lack of sunlight → pale leaves, weak stems
🌊 Excess water → yellow leaves, rotten roots
🍄 Fungal issues → spots, mold on leaves
🐛 Insects → holey leaves, presence of pests
Observe, care for, strengthen🌿
Common Root Vegetables
Common Root Vegetables

True Roots:
Carrot, Radish, Beetroot, Turnip, Parsnip, Chicory root, Burdock root, Daikon.
Tubers:
Potato, Sweet potato, Yam, Jerusalem artichoke (sunchoke), Oca.
Bulbs:
Red Onion, Vidalia onion, Shallot, Garlic, Fennel bulb.
Rhizomes:
Ginger, Turmeric (not explicitly shown but related), Horseradish.
Corms:
Taro, Cassava (also known as yuca).
soil testing
Soil Testing and Monitoring: Key to Healthy Soils and Sustainable Agriculture 🔬🌱
Soil testing and monitoring are essential practices for ensuring soil health, optimizing crop production, and promoting sustainable land use. By understanding the characteristics and conditions of soil, farmers and land managers can make informed decisions that enhance soil fertility and minimize environmental impacts. In this post, we’ll explore the importance of soil testing, key parameters to assess, and best practices for effective soil monitoring.
What is Soil Testing❓
Soil testing involves collecting soil samples and analyzing them in a laboratory to determine various properties, including nutrient levels, pH, organic matter content, and texture. This information helps land managers understand the nutrient status of their soils and make necessary amendments to support crop growth.
Importance of Soil Testing and Monitoring
1. Nutrient Management: Soil testing provides valuable data about nutrient availability, allowing for precise fertilizer applications that match crop needs and reduce excess inputs.
2. Soil Health Assessment: Regular monitoring can reveal changes in soil health over time, helping to identify potential issues such as nutrient depletion, compaction, or erosion.
3. Cost Efficiency: By tailoring inputs based on soil tests, farmers can avoid over-fertilization and save on costs associated with unnecessary chemical applications.
4. Environmental Protection: Accurate soil management reduces nutrient runoff into waterways, minimizing the risk of pollution and helping to maintain local ecosystems.
5. Improved Crop Yields: Understanding soil nutrient dynamics enables farmers to optimize crop production and improve overall yields.
Key Parameters to Assess in Soil Testing
1. pH Level: Soil pH affects nutrient availability and microbial activity. Most crops thrive in a pH range of 6.0 to 7.5.
2. Nutrient Levels: Assess macronutrients (nitrogen, phosphorus, potassium) and micronutrients (iron, magnesium, zinc) to understand what is available for plant uptake.
3. Organic Matter Content: Measuring organic matter helps gauge soil fertility and health, as it is essential for nutrient retention and microbial activity.
4. Soil Texture: Understanding the proportions of sand, silt, and clay in the soil influences water retention, drainage, and nutrient availability.
5. Cation Exchange Capacity (CEC): CEC indicates the soil's ability to hold and exchange nutrients, providing insight into soil fertility.
Best Practices for Soil Testing and Monitoring
1. Regular Testing: Conduct soil tests every 2-3 years or more frequently if significant changes in land use or management practices occur.
2. Proper Sampling Methods: Collect soil samples from different areas of the field to get a representative sample. Use clean tools and follow guidelines for depth and technique.
3. Use Reliable Labs: Choose accredited laboratories that follow standardized methods for soil analysis to ensure accurate results.
4. Interpreting Results: Work with local agricultural extension services or soil specialists to interpret soil test results and plan appropriate management practices.
5. Integrate Monitoring with Management Practices: Combine soil testing with other monitoring techniques like crop performance assessments and weather data to create a comprehensive soil management plan.
6. Keep Records: Maintain detailed records of soil tests, amendments made, and crop performance to track changes over time and adjust practices as needed.
Conclusion
Soil testing and monitoring play a crucial role in sustainable agriculture by providing vital information on soil health and fertility. By implementing regular soil assessments, farmers can make informed decisions that enhance crop production, protect the environment, and promote long-term soil sustainability. Investing in good soil management practices today ensures healthier soils for future generations.
---
🌿 Let’s ensure our soils are healthy and productive! Share your thoughts on soil testing and monitoring using the hashtags below!
Source: Gulab Orchard Shilaroo
Credits to the rightful owner
Regards,
Dr. Adarsha Gowda
Food Expert
Chairperson/Dean/Head (Former)
Entrepreneurship, Startup & Consultancy
Dept of Food Science
Dept of Food Processing & Engineering.
💫
#SoilTesting #SoilHealth #SustainableAgriculture #NutrientManagement #Environmental#Protection CropYield #HealthySoils AgTech PrecisionFarming #Agroecology
Grow Your Own Mango Tree From a Seed!
🥭 Grow Your Own Mango Tree From a Seed! 🌱

🔹 Step 1: Remove & Clean the Seed
Enjoy your mango 🍑 and save the seed!
👉 Rinse off any pulp and let it dry slightly.
🔹 Step 2: Open the Husk
Carefully cut open the tough outer shell to reveal the inner seed.
🛑 Be gentle to avoid damaging it!
🔹 Step 3: Pre-Germinate
Wrap the seed in a damp paper towel, place it in a plastic bag, and keep it in a warm spot.
🌡️ In a few days to weeks, you’ll see signs of sprouting!
🔹 Step 4: Plant the Seed
Once sprouted, plant the seed 1 inch deep in a pot with well-draining soil.
🌞 Choose a sunny window or spot with good light.
🔹 Step 5: Sunlight & Growth
Keep the soil moist but not soggy.
🌱 Watch it grow into a healthy seedling!
🔹 Step 6: Transition to the Ground
When your mango tree reaches 1–2 feet tall, it’s ready to be planted outdoors.
🌴 Pick a warm, sunny location and give it space to thrive!
Soil Testing and Monitoring: Key to Healthy Soils and Sustainable Agriculture 🔬🌱
Soil testing and monitoring are essential practices for ensuring soil health, optimizing crop production, and promoting sustainable land use. By understanding the characteristics and conditions of soil, farmers and land managers can make informed decisions that enhance soil fertility and minimize environmental impacts. In this post, we’ll explore the importance of soil testing, key parameters to assess, and best practices for effective soil monitoring.
What is Soil Testing❓
Soil testing involves collecting soil samples and analyzing them in a laboratory to determine various properties, including nutrient levels, pH, organic matter content, and texture. This information helps land managers understand the nutrient status of their soils and make necessary amendments to support crop growth.
Importance of Soil Testing and Monitoring
1. Nutrient Management: Soil testing provides valuable data about nutrient availability, allowing for precise fertilizer applications that match crop needs and reduce excess inputs.
2. Soil Health Assessment: Regular monitoring can reveal changes in soil health over time, helping to identify potential issues such as nutrient depletion, compaction, or erosion.
3. Cost Efficiency: By tailoring inputs based on soil tests, farmers can avoid over-fertilization and save on costs associated with unnecessary chemical applications.
4. Environmental Protection: Accurate soil management reduces nutrient runoff into waterways, minimizing the risk of pollution and helping to maintain local ecosystems.
5. Improved Crop Yields: Understanding soil nutrient dynamics enables farmers to optimize crop production and improve overall yields.
Key Parameters to Assess in Soil Testing
1. pH Level: Soil pH affects nutrient availability and microbial activity. Most crops thrive in a pH range of 6.0 to 7.5.
2. Nutrient Levels: Assess macronutrients (nitrogen, phosphorus, potassium) and micronutrients (iron, magnesium, zinc) to understand what is available for plant uptake.
3. Organic Matter Content: Measuring organic matter helps gauge soil fertility and health, as it is essential for nutrient retention and microbial activity.
4. Soil Texture: Understanding the proportions of sand, silt, and clay in the soil influences water retention, drainage, and nutrient availability.
5. Cation Exchange Capacity (CEC): CEC indicates the soil's ability to hold and exchange nutrients, providing insight into soil fertility.
Best Practices for Soil Testing and Monitoring
1. Regular Testing: Conduct soil tests every 2-3 years or more frequently if significant changes in land use or management practices occur.
2. Proper Sampling Methods: Collect soil samples from different areas of the field to get a representative sample. Use clean tools and follow guidelines for depth and technique.
3. Use Reliable Labs: Choose accredited laboratories that follow standardized methods for soil analysis to ensure accurate results.
4. Interpreting Results: Work with local agricultural extension services or soil specialists to interpret soil test results and plan appropriate management practices.
5. Integrate Monitoring with Management Practices: Combine soil testing with other monitoring techniques like crop performance assessments and weather data to create a comprehensive soil management plan.
6. Keep Records: Maintain detailed records of soil tests, amendments made, and crop performance to track changes over time and adjust practices as needed.
Conclusion
Soil testing and monitoring play a crucial role in sustainable agriculture by providing vital information on soil health and fertility. By implementing regular soil assessments, farmers can make informed decisions that enhance crop production, protect the environment, and promote long-term soil sustainability. Investing in good soil management practices today ensures healthier soils for future generations.
---
🌿 Let’s ensure our soils are healthy and productive! Share your thoughts on soil testing and monitoring using the hashtags below!
Source: Gulab Orchard Shilaroo
Credits to the rightful owner
Regards,
Dr. Adarsha Gowda
Food Expert
Chairperson/Dean/Head (Former)
Entrepreneurship, Startup & Consultancy
Dept of Food Science
Dept of Food Processing & Engineering.
💫
#SoilTesting #SoilHealth #SustainableAgriculture #NutrientManagement #Environmental#Protection CropYield #HealthySoils AgTech PrecisionFarming #Agroecology
Wednesday, July 16, 2025
sound sleep
Off The RecordIf You Are Waking Up In The Middle Of The Night, Fix These 8 Things ASAP
You can be soundly asleep one moment and then awake in the middle of the night the next. Does that sound familiar?
You may have previously encountered this type of insomnia, unless you are fortunate enough to wake up like the most resolute of logs.
It’s not unusual to wake up in the middle of the night; according to a Sleep Medicine study of 8,937 people, roughly one-third of American adults wake up in the middle of the night at least three times per week, and more than 40% of them may experience difficulty falling back asleep (a condition sometimes called sleep maintenance insomnia).
Ezoic
What is the reason for your nighttime awakenings, and how can you prevent them? Here are eight typical causes and tips for getting a good night’s sleep.
Source: Freepik
Ezoic
1. Your room is too hot, cold, noisy, or bright.
Rita Aouad, M.D., a sleep medicine specialist at The Ohio State University Wexner Medical Center, tells SELF that your arousal threshold—or how easily something might wake you up—varies based on your sleep stage.
Your body goes through several stages of sleep, including rapid-eye movement (REM), 1, 2, 3, and 4. (Some schools of thought combine stages three and four into one.)
According to Dr. Aouad, the initial stage of sleep is the lightest.
Ezoic
You’re more likely to be startled awake at that time by a slamming door, headlights from a passing automobile shining into your window, or other environmental factors like your room being excessively hot or chilly.
When you sleep, your room should ideally be quiet, dark, and comfortably cool. You may not be able to manage all of this, but you can take steps like purchasing a fan if your room is stuffy or blocking out distracting light and noise with an eye mask and earplugs.
2. You have anxiety.
“Anxiety can absolutely wake you up at night,” Nesochi Okeke-Igbokwe, M.D., a physician in New York, tells SELF. In fact, trouble sleeping is one of the most common symptoms of an anxiety disorder, according to the Mayo Clinic. That’s because you can experience anxiety-induced issues that are severe enough to wake you, like a galloping heartbeat or nightmares.
“Additionally, there are people who may experience what are called nocturnal panic attacks, meaning they may have transient episodes of intense panic that wake them up from their slumber,” Dr. Okeke-Igbokwe says.
Ezoic
Dr. Okeke-Igbokwe advises discussing your anxiety with your physician if it causes you to wake up frequently. Your physician should be able to assist you in identifying any underlying anxiety or panic problem that may be at work.
Cognitive behavioral therapy, anti-anxiety drugs, or a mix of the two may be used to achieve this. “Meditation and deep breathing exercises can also sometimes alleviate symptoms in some people,” Dr. Okeke-Igbokwe says.
Ezoic
3. Your full bladder can’t wait until the morning.
It seems to be pretty common to have nocturia, which is commonly defined as waking up at least once throughout the night to urinate, but other experts believe that’s not always enough to qualify.
According to a study published in the International Neurourology Journal, nocturia affected about 29% of men and 23% of women out of 856 respondents.
According to the Cleveland Clinic, nocturia can be caused by an overactive bladder, urinary tract infections, and excessive fluid consumption before bed. According to the Mayo Clinic, untreated type 1 or type 2 diabetes may also play a role.
When blood sugar levels are too high, the body has to draw fluid from the tissues, which causes thirst and may lead to increased drinking and urination.
Ask a doctor about other potential causes if reducing your evening fluid intake doesn’t result in fewer nighttime bathroom excursions.
4. You had a couple of alcoholic drinks.
Alcohol can certainly help you fall asleep, even if you’re not in your bed but rather, say, on a friend’s couch. However, it can also lead to restless sleep.
Ezoic
This is due to the fact that alcohol can alter your sleep cycles in a number of ways. For example, it appears that drinking alcohol causes more stage 1 sleep than normal during the second half of the night.
Recall that stage 1 sleep is the time when environmental events are most likely to cause you to wake up. Thus, it’s worthwhile to consider your alcohol intake if you want to get good sleep-through-the-night sleep.
Depending on their body size, food, and genetics, each person metabolizes alcohol in a unique way.
To give their bodies time to digest the alcohol, Alexea Gaffney Adams, M.D., a board-certified internist at Stony Brook Medicine, advises patients to stop drinking at least three hours before bed.
Ezoic
We understand that drinking can be a positive time buffer because it frequently occurs at night. You may not require that much, depending on your individual circumstances and alcohol use.
Alcohol may not interfere with your sleep, though, if you have some sort of buffer and drink lots of water to make you more likely to drink in moderation.
Ezoic
Additionally, drinking alcohol right before bed will cause you to need to urinate, which increases the chance that you will wake up during the night to use the restroom, according to Dr. Gaffney Adams. This double-edged effect was significant.
5. You’ve got sleep apnea.
Sleep apnea may be the cause if you frequently wake up feeling like you need to catch your breath. This condition causes your breathing to slow or stop while you’re asleep.
Ezoic
According to the Mayo Clinic, obstructive sleep apnea is caused by excessive relaxation of the muscles in the throat, which narrows the airway and lowers oxygen levels.
This potentially dangerous dip in oxygen is caused by central sleep apnea, which occurs when your brain fails to communicate with the muscles that control your breathing. Both disorders’ traits are present in complex sleep apnea.
Ezoic
According to the Mayo Clinic, your doctor could ask you to participate in an overnight sleep study that tracks your breathing in order to identify sleep apnea.
A continuous positive airway pressure (CPAP) machine, which is essentially a mask you wear while you sleep to help keep your airways open, is the most popular therapy for sleep apnea. However, if you need more information, your doctor can help you look into other options.
Ezoic
6. You have an overactive thyroid gland.
“This gland controls the function of several other organs,” Dr. Gaffney Adams tells SELF. According to the Mayo Clinic, when it is overactive (also known as hyperthyroidism), it produces an excessive amount of the hormone thyroxine, which can impact numerous bodily systems.
An elevated heart rate, anxiety, tremors, perspiration, even at night, and difficulty sleeping are all typical signs of an overactive thyroid.
Ezoic
Your blood can be tested to determine your hormone levels by your primary care physician or an endocrinologist, a specialist in hormones.
Your doctor can explain the many treatment options for an overactive thyroid, such as beta-blockers to lessen symptoms like a racing heartbeat and drugs to limit the thyroid’s hormone production.
7. You ate right before bedtime, or you didn’t eat recently enough before you went to sleep.
“Eating too heavy of a meal too close to bedtime can make it difficult to fall asleep or stay asleep,” Dr. Aouad says. One potential reason behind this is acid reflux, which is when your stomach acid moves up into your throat and causes painful nighttime heartburn. And if you eat food right before bed that makes you gassy, the resulting abdominal pain could drag you out of dreamland, too.
However, according to Dr. Aouad, this kind of insomnia can also result from skipping meals for an extended period of time before bed.
The first is that you can be awakened by your stomach’s growling and cramping. Additionally, hunger might affect blood sugar levels when you sleep, particularly if you have diabetes.
Hypoglycemia, a condition in which your blood sugar falls too low, can be brought on by going too long without eating. According to the Cleveland Clinic, this can cause problems including weakness or tremors, disorientation, and confusion, as well as disturbed sleep.
While anyone can experience hypoglycemia, diabetics are far more prone to do so. Work with your physician to develop a strategy for maintaining stable blood sugar levels, even while you sleep, if you have the illness.
8. You have restless legs syndrome.
The National Institute of Neurological Disorders and Stroke (NINDS) states that restless legs syndrome, or RLS, can cause your lower limbs to feel as though they are throbbing, itching, aching, pulling, or crawling, among other feelings.
An insatiable desire to move your legs is another symptom of RLS. These symptoms worsen during periods of inactivity, such as sleep, and are most prevalent in the evening and at night.
Although the exact origin of RLS is unknown, experts believe that a genetic component may be involved, according to the NINDS. Researchers are also looking into how RLS can be caused by problems with dopamine, a neurotransmitter that your muscles require to function properly.
RLS can occasionally be caused by additional underlying conditions, such as iron insufficiency.
Your doctor may recommend treatments like muscle relaxants or medications to raise your dopamine levels after determining that you have RLS through lab testing and questioning. They might also be able to provide you with advice on how to relax your muscles at home, such as taking warm baths.
rain garden
The design of a rain garden and its role in stormwater management. The top view shows a garden bed that collects and absorbs rainwater, while the side section provides more detail about its components. The rain garden includes bio-retention soil, which helps filter and absorb water, and a perforated pipe for water drainage. The garden is designed with a gravel base to allow for proper water flow and retention. Mulch is added to the surface to retain moisture and prevent erosion, and the garden is typically located near curb notches to capture runoff from streets or driveways. This sustainable landscape feature helps reduce water runoff, improve water quality, and support local ecosystems by promoting better water infiltration and plant growth.

Source:Ajmal Sohail
Credits to the rightful owner
Regards,
Dr. Adarsha Gowda
Food Expert
Chairperson/Dean/Head (Former)
Entrepreneurship, Startup & Consultancy
Dept of Food Science
Dept of Food Processing & Engineering.
💫
Food is Medicine
🌿 Food is Medicine: How Nature Nourishes and Heals 🌍

🍍 Pineapple: Reduces inflammation and eases joint pain.
🍷 Pomegranate: Boosts blood flow and protects red blood cells.
🍅 Tomato: Packed with nutrients for a healthier heart.
🧠 Walnut: High in omega-3s for better memory and focus.
🍠 Beetroot: Detoxes the liver and boosts circulation.
🥕 Carrot: Beta-carotene for sharp vision.
🍠 Sweet Potato: Regulates blood sugar and aids digestion.
🌿 Ginger: Soothes nausea and supports digestion.
🍇 Grapes: Protect lungs from toxins.
🫘 Kidney Beans: Support kidney health with fiber and minerals.
Embrace nature’s healing! 💚
Tomato Variety
The Tomato Variety Showcase

Tomato Variety Showcase" featuring numerous types of heirloom tomatoes, including:
Pruden's Purple
Arkansas Traveler
Chico
Better Boy
Florida 91
Jet Star
Jetsetter
Lucid Gem
Cherokee Carbon
Chef's Orange
Super Fantastic
Indian Stripe
LaRoma
Juan Flamme
Brandy Boy
Lemon Boy
Early Girl
Cuore di Bue
Sart Roloise
Paul Robeson
Terra Cotta
Mexico Midget
Barry's Midget
Barry's Crazy Cherry
Super Sweet 100
Sweet Million
Juliet
Heirloom tomatoes are open-pollinated varieties, meaning their seeds produce offspring identical to the parent plant, unlike hybrid tomatoes. They are typically known for their diverse colors, shapes, sizes, and flavors, which often differ significantly from the more uniform commercial varieties. Many heirloom varieties have been passed down through generations of growers for at least 50 years, or were introduced commercially before 1940.
Monday, July 14, 2025
പഴം പൊരി
പഴം പൊരി ഒരു തവണ ഇങ്ങനെ ഉണ്ടാക്കി നോക്കൂ! വെറും 5 മിനിറ്റു മതി നല്ല മൊരിഞ്ഞ സൂപ്പർ പഴം പൊരി റെഡി. ഇന്ന് നമ്മൾ ഇവിടെ ഉണ്ടാക്കാൻ പോകുന്നത് ഒരു അടിപൊളി പഴം പൊരിയുടെ റെസിപ്പിയാണ്.
വീഡിയോ കാണാൻ : https://bitly.cx/CDzZ
Kerala Style Tasty Pazham Pori Recipe
Pazham pori, also known as banana fritters, is a popular snack in Kerala. Here's a simple recipe to make delicious pazham pori:
Ingredients
- *Ripe bananas*: 4-5
- *All-purpose flour*: 1 cup
- *Sugar*: 1-2 tablespoons
- *Salt*: A pinch
- *Ghee or oil*: For frying
- *Optional ingredients*: Cardamom powder, cinnamon powder, or coconut flakes for added flavor
Instructions
1. *Mash the bananas*: Mash the ripe bananas in a bowl.
2. *Mix the batter*: Mix all-purpose flour, sugar, and salt with the mashed bananas to form a thick batter.
3. *Add flavorings*: Add cardamom powder, cinnamon powder, or coconut flakes to the batter for extra flavor.
4. *Heat oil*: Heat ghee or oil in a deep frying pan.
5. *Fry the pori*: Drop small portions of the batter into the hot oil and fry until golden brown.
6. *Drain excess oil*: Drain the excess oil on paper towels.
7. *Serve*: Serve the pazham pori hot and enjoy!
Tips and Variations
- *Use ripe bananas*: Ripe bananas will make the pazham pori sweeter and softer.
- *Adjust sugar content*: Adjust the amount of sugar according to your taste preferences.
- *Experiment with flavors*: Try adding different flavorings like cinnamon, nutmeg, or cardamom to the batter.
Serving Suggestions
- *Snack*: Serve pazham pori as a snack with a cup of tea or coffee.
- *Dessert*: Serve pazham pori as a dessert with a scoop of ice cream or a drizzle of honey.
Enjoy making and devouring these delicious Kerala-style pazham pori!
Calcium
🦴 Don’t Ignore These Signs! Is Your Body Lacking Calcium? 🥛💥
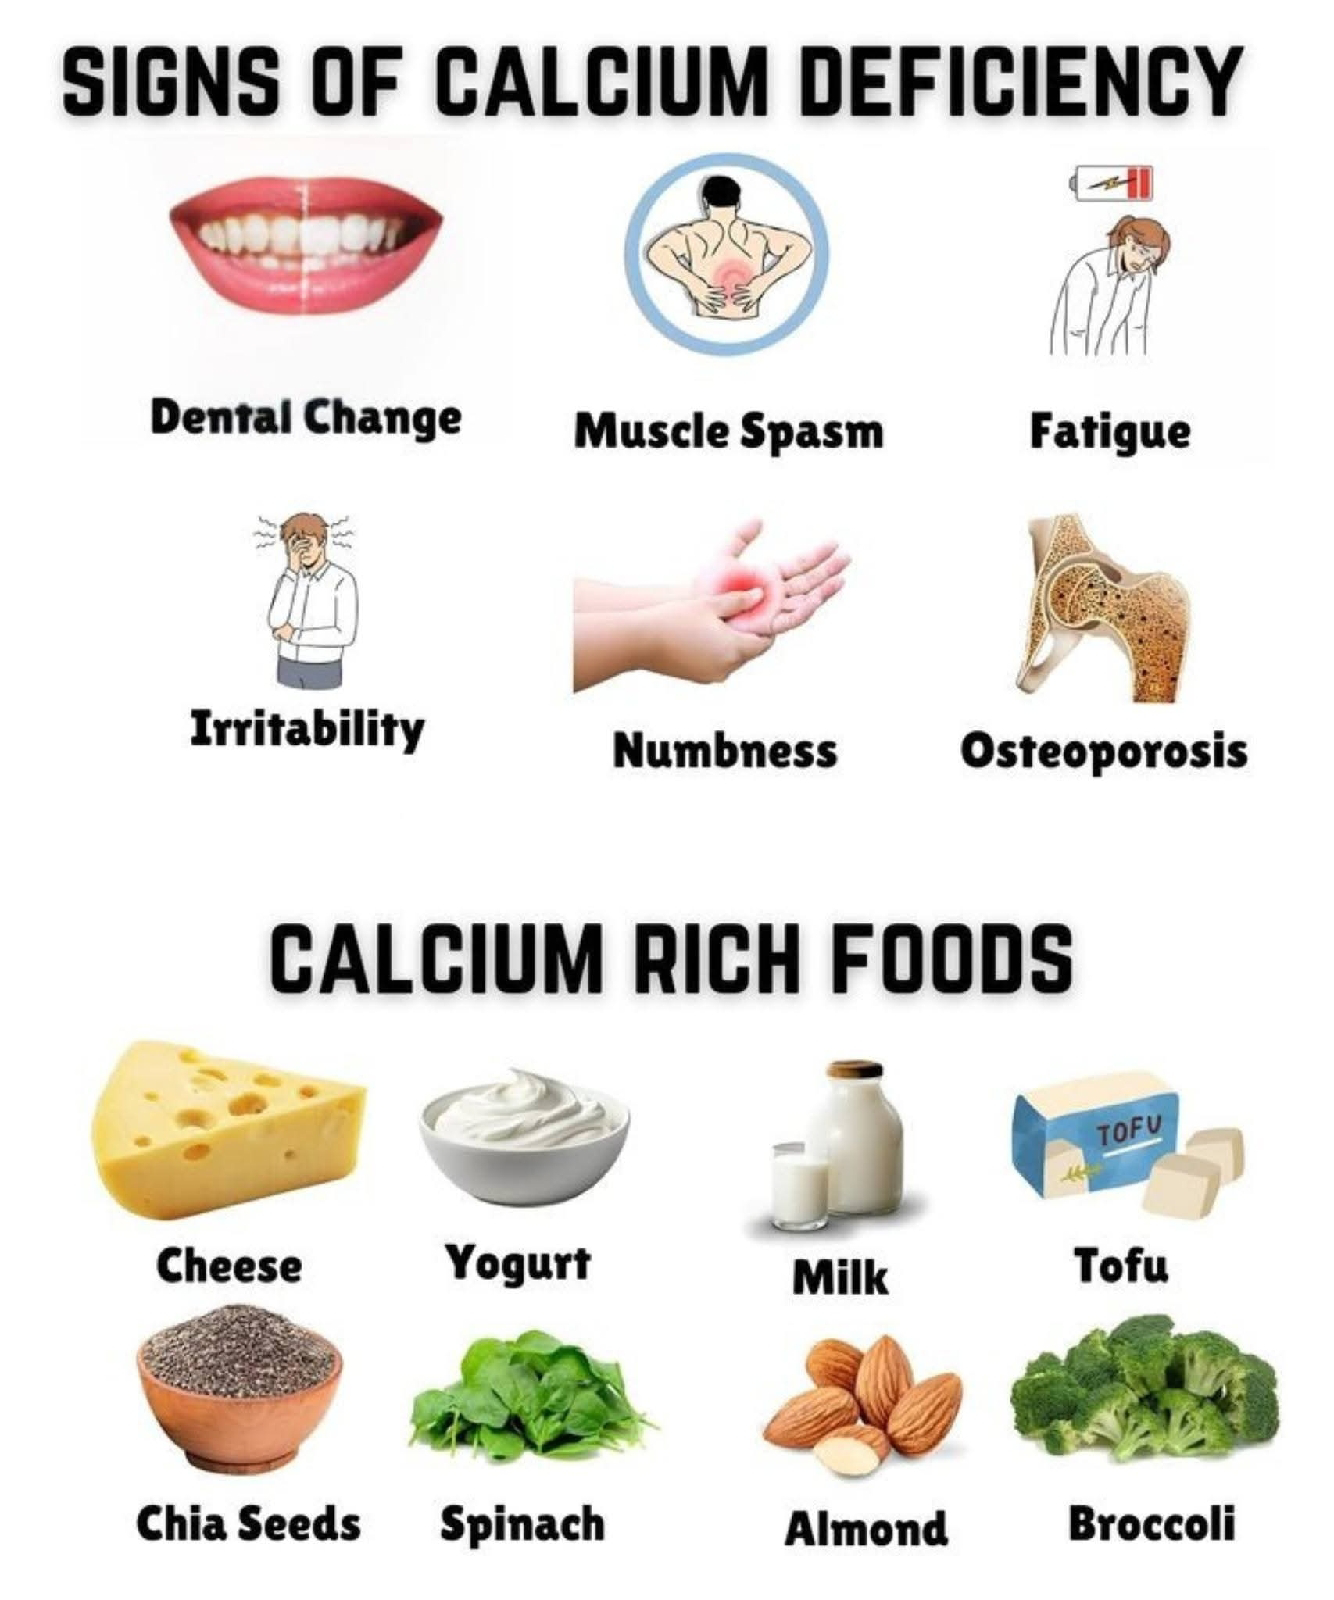
⚠️ Common Signs of Calcium Deficiency:
😬 Dental Changes – Weak or decaying teeth
💥 Muscle Spasms – Sudden cramps or twitching
😩 Fatigue – Always feeling tired or low energy
😠 Irritability – Mood swings or feeling on edge
🤲 Numbness – Tingling or reduced sensation in hands/feet
🦴 Osteoporosis – Bone thinning & fracture risk
🥦 Top Calcium-Rich Foods to Add to Your Diet:
🧀 Cheese – Delicious and calcium-packed
🥣 Yogurt – Great for digestion and bones
🥛 Milk – Classic go-to for calcium and vitamin D
🍲 Tofu – A plant-based powerhouse
🌱 Chia Seeds – Tiny but mighty in nutrients
🥬 Spinach – Leafy green with bonus iron
🥜 Almonds – Crunchy snack full of calcium
🥦 Broccoli – Great for bones and overall health
👩⚕️ Tip: Pair calcium-rich foods with vitamin D (like sunshine or eggs) to help your body absorb it better!
grow
🥭 Grow Your Own Mango Tree From a Seed! 🌱

🔹 Step 1: Remove & Clean the Seed
Enjoy your mango 🍑 and save the seed!
👉 Rinse off any pulp and let it dry slightly.
🔹 Step 2: Open the Husk
Carefully cut open the tough outer shell to reveal the inner seed.
🛑 Be gentle to avoid damaging it!
🔹 Step 3: Pre-Germinate
Wrap the seed in a damp paper towel, place it in a plastic bag, and keep it in a warm spot.
🌡️ In a few days to weeks, you’ll see signs of sprouting!
🔹 Step 4: Plant the Seed
Once sprouted, plant the seed 1 inch deep in a pot with well-draining soil.
🌞 Choose a sunny window or spot with good light.
🔹 Step 5: Sunlight & Growth
Keep the soil moist but not soggy.
🌱 Watch it grow into a healthy seedling!
🔹 Step 6: Transition to the Ground
When your mango tree reaches 1–2 feet tall, it’s ready to be planted outdoors.
🌴 Pick a warm, sunny location and give it space to thrive!
natural nutrients
Boost Your Nutrition Naturally! 🌿✨ Must-Have Foods for Key Vitamins & Minerals

🍊 Vitamin C – Immunity & Skin Glow!
Fuel your defense system and boost collagen naturally.
✅ Amla
✅ Guava
✅ Peppers
✅ Citrus Fruits
☀️ Vitamin D – Strong Bones & Mood Boost!
Especially important if you're not getting enough sun!
✅ Milk Products
✅ Eggs
✅ Fish
✅ Mushrooms
🦴 Calcium – Bone Strength & Muscle Function!
Support your bones and prevent cramps.
✅ Milk
✅ Leafy Greens
✅ Sesame Seeds
✅ Soya Beans
❤️ Iron – Energy & Healthy Blood Flow!
Beat fatigue and keep your blood oxygen-rich.
✅ Tofu
✅ Peas
✅ Lentils
✅ Spinach
🛡️ Zinc – Immunity & Wound Healing!
A mineral your body can’t do without.
✅ Oysters
✅ Soya Beans
✅ Pumpkin Seeds
✅ Nuts
🌿 Magnesium – Relaxation & Nerve Support!
Ease stress, muscle tension & support brain function.
✅ Nuts
✅ Spinach
✅ Oats
✅ Banana
Chaplin bucket
Efficient Watering with the Chapin Bucket: Revolutionizing Small-Scale Agriculture 💙
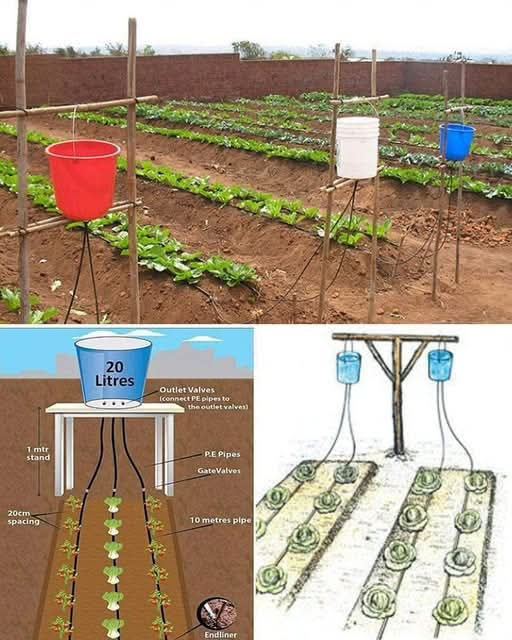
The Chapin Bucket consists of a large, sturdy plastic bucket with several carefully designed features that maximize its efficiency in distributing water to crops. Its key components include a sealed lid with a handle, a series of strategically placed holes, and a hose attachment. The principle behind the Chapin Bucket is both simple and effective: it utilizes gravity to provide a steady and controlled flow of water to the plants.
Here’s how the Chapin Bucket works:
Water Source: The farmer fills the bucket with water from a nearby source, such as a well or a river.
Sealed Lid: The sealed lid prevents evaporation and contamination of the water, ensuring that it remains clean and ready for irrigation.
Hose Attachment: The hose attachment at the base of the bucket allows the farmer to connect a hose of varying lengths, depending on the distance between the water source and the crops.
Controlled Distribution: As the bucket is elevated on a stand or hung from a tree branch, gravity forces water to flow steadily through the strategically placed holes in the bucket’s bottom. The farmer can control the flow rate by adjusting the size and number of holes or by raising or lowering the bucket.
The advantages of the Chapin Bucket are numerous:
Affordability: One of the most significant advantages is its low cost. The Chapin Bucket can be assembled from readily available materials, making it affordable for even the most resource-constrained farmers.
Simplicity: The design is straightforward and user-friendly, requiring minimal training. Farmers can easily construct and maintain their Chapin Bucket systems.
Efficiency: The controlled distribution of water minimizes waste and ensures that each plant receives an adequate amount of water. This efficiency can lead to increased crop yields.
Accessibility: The Chapin Bucket can be used in various farming scenarios, from small family plots to community gardens and larger agricultural endeavors.
Sustainability: By conserving water and reducing the need for manual labor, the Chapin Bucket contributes to more sustainable agricultural practices.
Empowerment: Small-scale farmers can take control of their irrigation needs and reduce their dependency on unpredictable weather conditions.
Papaya
How to Determine the Sex of Papaya Plants


Determining the sex of papaya plants is crucial for effective cultivation and fruit production. Here's a simple guide to help you identify male, female, and hermaphrodite papaya plants:
Characteristics of Male Papaya Plants
1. Slender stalk: Male plants have longer, thinner stalks (10-20 cm) with smaller leaves.
2. Small, thin flowers: Male flowers are smaller (about 1-2 cm in diameter) and have narrow petals.
3. No ovary: Male flowers lack an ovary (fruit-bearing structure).
4. Typically more flowers: Male plants produce more flowers, but they don't develop into fruit.
Characteristics of Female Papaya Plants
1. Shorter stalk: Female plants have shorter, thicker stalks (5-10 cm) with larger leaves.
2. Larger, thicker flowers: Female flowers are larger (about 2-5 cm in diameter) with wider petals.
3. Ovary present: Female flowers have a prominent ovary (fruit-bearing structure) at the base.
4. Fewer flowers: Female plants produce fewer flowers, but they develop into fruit.
Characteristics of Hermaphrodite Papaya Plants
1. Combination of male and female characteristics: Hermaphrodite plants have both male and female reproductive organs.
2. Shorter stalk: Similar to female plants.
3. Larger flowers: Similar to female plants.
4. Ovary present: Hermaphrodite plants have both male and female reproductive organs.
Timing of Sex Identification
1. Seedlings: Sex identification is difficult at the seedling stage (1-2 months).
2. Flowering stage: Observe flowers for sex characteristics around 3-6 months after planting.
3. Fruiting stage: Confirm sex by observing fruit development (6-12 months).
Tips for Papaya Cultivation
1. Plant multiple seedlings: Increase chances of getting female or hermaphrodite plants.
2. Remove male plants: Once identified, remove male plants to direct resources to female or hermaphrodite plants.
3. Hand-pollination: Assist pollination by transferring pollen from male to female flowers.
Understanding the sex of papaya plants helps in effective cultivation and ensures a healthy and productive harvest
#fypシ #everyoneシ゚ #foryouシ #viralpost
#photo #trendingpost #everyonefollowers
#gardentips #gardening #plantingtips #highlightsシ゚
Subscribe to:
Comments (Atom)