Tuesday, April 15, 2025

Veg Tandoori Au Gratin with Leftover Rice

Ingredients:
For the Spinach Layer:
• 2-3 cups of leftover rice
• 1 bunch of spinach
• 2 green chilies
• 1 inch piece of ginger
• 1 teaspoon finely chopped garlic
• ½ cup of coriander leaves
• 8-9 mint leaves
• ½ tablespoon of oregano
• ½ tbsp chili flakes
• Salt to taste
• 2-3 tablespoons of oil
For the Tandoori Sauce:
• 150 grams of grated cheese
• 1/3 cup of oats powder
• 2-3 tbsp of butter
• 1 tablespoon of finely chopped garlic
• ½ cup of chopped broccoli
• ¼ cup of diced red capsicum
• ¼ cup of diced green capsicum
• ¼ cup of diced yellow capsicum
• ½ cup of chopped baby corn
• ¼ cup of chopped beans
• ¼ cup of chopped mushrooms
• ¼ cup of chopped carrots
• 1/3 cup of sweet corn
• ½ tablespoon of chili flakes
• ½ tablespoon of oregano
• ½ tablespoon of Kashmiri red chili powder
• 2 teaspoons of tandoori powder
• Salt to taste
• 400 grams of milk, or as required
For Garnishing:
• Grated cheese
• Chili flakes
• Olives
• Spring onion
Method:
Prepare the Spinach Layer:
1. Blend spinach, green chilies, ginger, coriander leaves, mint leaves.
2. Heat oil in a pan, add garlic and chilli flakes sauté for few minutes.
3. Add the spinach paste, and again sauté for a few minutes.
4. Mix in the leftover rice and cook for another 3-4 minutes. Set aside.
Make the Tandoori Sauce:
1. In a separate pan hit oil and add garlic sauté. then Add broccoli, red capsicum, green capsicum, yellow capsicum, baby corn, beans, mushrooms, carrots, and sweet corn. Cook until vegetables are slightly tender.
2. Add chilli flakes, oregano and salt mix it well. Set aside.
3. In a other pan, melt butter and add oats powder. Sauté for few minutes.
4. Pour in milk gradually, stirring continuously until the mixture thickens.
5. Add grated cheese and stirring until cheese is melted and the sauce is smooth.
6. Stir in chili flakes, Kashmiri red chili powder, tandoori powder, and salt. Cook for another 2-3 minutes.
7. Then add vegetable mixture on it. Mix it all gradually. Its ready to tandoori sauce.
Assemble the Dish:
1. Spread the spinach rice mixture evenly in a baking dish.
2. Pour the prepared tandoori sauce over the rice layer, ensuring even coverage.
3. Garnish with grated cheese, chili flakes, olives, and spring onion.
4. Bake in the preheated pan for 20-25 minutes or until the cheese is bubbly and golden brown.
5. Serve hot and enjoy your Veg Tandoori Au Gratin with Leftover Rice!
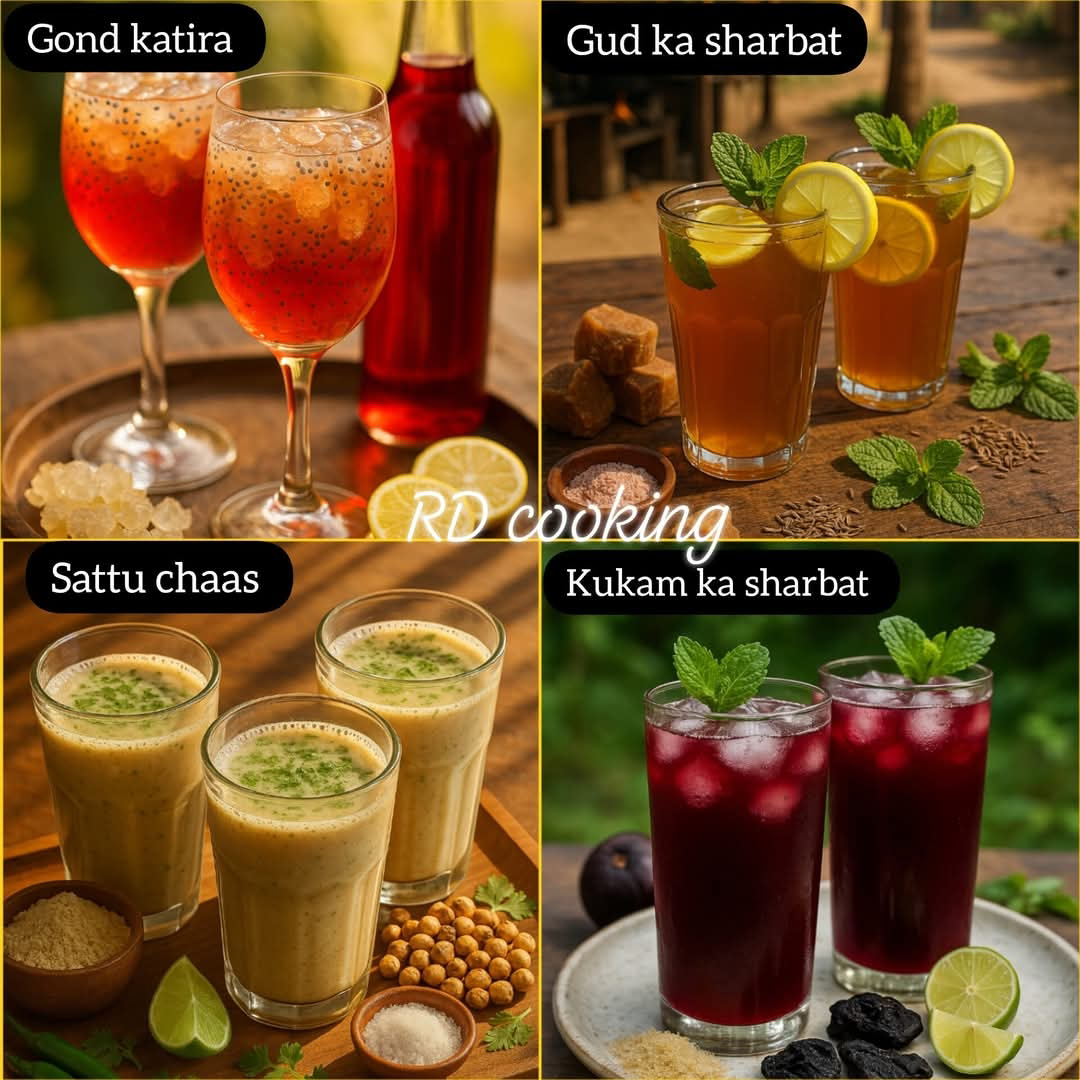
सभी की recipe यहां दी गई है 👇

1 :- Gond Katira Sharbat Recipe (Cooling Summer Drink)

Ingredients:

Gond Katira (Edible gum) – 2 tbsp

Cold water – 2 cups

Rose syrup – 2 tbsp (or as per taste)

Lemon juice – 1 tsp (optional)

Sugar – if needed

Ice cubes – optional

Chopped nuts (almonds, pistachios) – for garnish

Basil seeds (sabja) – 1 tsp soaked (optional)

---

Instructions:

1. Soak the gond katira:
Wash gond katira thoroughly and soak in water overnight (or for 6–8 hours) until it becomes jelly-like and fluffy.

2. Prepare the sharbat:
Take 2 tbsp of the soaked gond katira and add it to a glass.

3. Add rose syrup & water:
Pour in cold water and rose syrup. Mix well. Add sugar if needed.

4. Add lemon juice (optional):
If you like a tangy twist, add a few drops of lemon juice.

5. Garnish & serve:
Add soaked sabja seeds (optional), top with chopped nuts and ice cubes.

6. Serve chilled and enjoy!

---

Tip: Gond katira is a natural coolant and is excellent for keeping the body cool during hot summer days.

2 :- Gud Ka Sharbat (Jaggery Drink) Recipe – English

Ingredients:

Grated or powdered jaggery – 3 to 4 tbsp

Cold water – 2 glasses (approx. 500 ml)

Lemon juice – 1 to 2 tsp (optional, for tanginess)

Roasted cumin powder – ½ tsp

Black salt – ½ tsp

Ginger juice – ½ tsp (optional)

Mint leaves – few, chopped (optional)

Ice cubes – as needed

---

Instructions:

1. Dissolve jaggery:
In a bowl, mix jaggery with a small amount of lukewarm water. Stir until it dissolves completely. Strain to remove impurities if needed.

2. Mix the drink:
Add this jaggery water to a jug. Pour in cold water and mix well.

3. Add flavor:
Stir in black salt, roasted cumin powder, lemon juice, and ginger juice (if using).

4. Garnish & serve:
Add chopped mint leaves and ice cubes. Mix again.

5. Serve chilled – perfect for hot summer afternoons!

---

Tip:
Gud ka sharbat is rich in minerals and helps in cooling the body, improving digestion, and boosting energy naturally.

3 :- Sattu Chaas (Savory Sattu Buttermilk) Recipe – English

Ingredients:

Sattu (roasted gram flour) – 2 tbsp

Buttermilk – 2 cups (or 1 cup curd + 1 cup water whisked)

Roasted cumin powder – ½ tsp

Black salt – ½ tsp (or to taste)

Chopped mint leaves – 1 tbsp

Chopped coriander leaves – 1 tbsp

Green chili – 1, finely chopped (optional)

Grated ginger – ½ tsp

Lemon juice – 1 tsp (optional)

Ice cubes – as needed

---

Instructions:

1. Prepare the base:
In a mixing bowl, add sattu and a little buttermilk. Whisk well to make a smooth paste without lumps.

2. Add remaining ingredients:
Pour in the remaining buttermilk. Add black salt, roasted cumin powder, mint, coriander, green chili, and ginger. Mix well.

3. Adjust flavor:
Add lemon juice if you like a tangy twist. Adjust salt as per taste.

4. Serve chilled:
Pour into glasses, drop in some ice cubes, and garnish with mint leaves or a sprinkle of cumin.

Refreshing, hydrating, and full of fiber – Sattu Chaas is a perfect summer drink for digestion and energy!

4 :- Kokum Sharbat Recipe – English

Ingredients:

Dried kokum (amsul) – 10–12 pieces

Sugar – ½ to ¾ cup (adjust to taste)

Cumin powder – ½ tsp

Black salt – ½ tsp

Regular salt – a pinch

Cardamom powder – ¼ tsp (optional)

Water – 2 to 3 cups

Ice cubes – as needed

Mint leaves – for garnish (optional)

---

Instructions:

1. Soak kokum:
Wash the dried kokum and soak it in 1 cup of warm water for 2–3 hours (or overnight for best results).

2. Make kokum extract:
Once soaked, mash the kokum gently to extract its juice. Strain the mixture and discard the leftover solids.

3. Add flavor & sweetener:
To the strained kokum juice, add sugar, black salt, cumin powder, regular salt, and cardamom powder. Stir until the sugar dissolves completely.

4. Dilute & chill:
Add 1–2 cups of cold water to dilute the concentrate as per your taste. Add ice cubes.

5. Serve:
Pour into glasses and garnish with mint leaves if desired. Serve chilled.

---

Tip:
Kokum is a natural coolant, aids digestion, and is perfect for summer hydration. You can also store the concentrate in the fridge for 4–5 days.
Cultivating Vegetables and Herbs in Pots: A Guide to Container Gardening
Container gardening is a great way to grow vegetables and herbs in small spaces like balconies or patios. The key is choosing the right pot size for each plant. Here’s a quick guide:

Choosing the Right Pot Size

5L Pots: Lettuce, Chard, Parsley, Basil, Chives

10L Pots: Radish, Celery, Turnip, Carrot, Kale

15L Pots: Cabbage, Beet, Garlic, Brussels Sprouts, Chilies

20L Pots: Tomato, Broccoli, Pepper, Chícharo (peas), Cauliflower

40L Pots: Cucumber, Potatoes, Watermelon, Zucchini, Melon

Quick Tips for Success

Use Quality Soil: Nutrient-rich, well-draining potting mix.

Sunlight: At least 6-8 hours daily.

Water Consistently: Pots dry out faster than ground soil.

Fertilize: Use organic or liquid fertilizers as needed.

Drainage: Ensure pots have drainage holes.

Support Climbing Plants: Use trellises or stakes.

Final Thoughts

With the right pot size and care, container gardening is an easy and effective way to grow fresh produce at home.

roses

Blooming Beauties: Growing Roses from Branches Made Simple

If you’re captivated by the idea of transforming your garden into a haven of beautiful roses, here’s an easy and cost-effective method to try – growing roses from branches. This approach allows you to propagate and cultivate new rose plants without much fuss. Let’s explore the simple steps to turn your rose branches into flourishing blooms.

1. Selecting Healthy Rose Branches: Begin by choosing healthy rose branches from a mature rose plant. Opt for branches that are disease-free, have a few sets of leaves, and show vigorous growth.

2. Taking Rose Cuttings: Use sharp pruning shears or scissors to take cuttings from the selected rose branches. Each cutting should be about 6-8 inches long, with at least two sets of leaves. Make a clean cut just below a leaf node at a 45-degree angle.

3. Removing Excess Leaves: Trim away excess leaves from the lower portion of the cuttings, leaving only a couple of leaves at the top. This helps reduce water loss and encourages root development.

4. Applying Rooting Hormone (Optional): While not mandatory, dipping the cut end of the rose cutting in rooting hormone can enhance the chances of successful root development. This step is particularly useful for expedited growth.

5. Planting the Rose Cuttings: Fill a small pot with well-draining potting soil. Make holes in the soil using a stick or your finger and insert the cut ends of the rose cuttings. Plant multiple cuttings in the same pot, ensuring they are spaced apart.

6. Watering and Placement: Water the soil thoroughly after planting, and place the pot in a location with bright, indirect sunlight. Roses thrive with at least 6 hours of sunlight per day.

7. Creating a Mini Greenhouse: Cover the pot with a clear plastic bag or a plastic dome to create a mini greenhouse effect. This helps retain humidity around the cuttings, promoting successful rooting.

8. Regular Moistening: Keep the soil consistently moist, but not waterlogged. Check the moisture level regularly and water whenever the top inch of soil feels dry.

9. Transplanting into Larger Pots: Once your rose cuttings have developed strong roots and grown several inches tall, they are ready to be transplanted into larger pots or directly into your garden.

10. Patience and Care: Growing roses from branches requires a bit of patience. Be attentive to the needs of your young plants, provide adequate sunlight, and watch as they transform into beautiful rose bushes.

Growing roses from branches is a fulfilling and budget-friendly way to expand your garden with stunning blooms. With a little care and patience, you’ll soon be rewarded with a display of vibrant roses, adding elegance and charm to your outdoor space. 

Happy growing!
RASAM POWDER Stay away from adulteration Make your own Rasam Powder at home with these ingredients

Ingredients
Coriander seeds 3/4 Cup
Red chilli long variety 10-15
Toor dal 1/4 Cup
Chana dal 1/4 Cup
Black pepper 3 Tbsp
Cumin seeds 3 Tbsp
Hing 1 Tsp

Procedure 
Dry roast channa dal and toor dal first until dals are golden in colour. Roast at medium flame with constant stirring. Transfer to a plate for cooling and then roast coriander seeds and pepper until fragrant.
Once the coriander seeds is roasted well, it lends a great flavour, add jeera and roast until it starts popping lastly add red chillies and hing roast for few seconds   
Cool everything completely.
Grind it to a fine powder in a mixer and store in an airtight container.
#NishasCookingPassion #rasampowder

Best Crops to Plant in April: A Gardening Guide
1. Broccoli – A cool-season vegetable, broccoli grows best when planted in early spring. Ensure it gets plenty of sunlight and well-drained soil.

2. Cauliflower – Like broccoli, cauliflower thrives in cooler weather. Start planting in April for a summer harvest.

3. Brussels Sprouts – These small but nutritious veggies require a long growing season, making early spring the perfect time to start them.

4. Beetroot – Beets are a fast-growing root vegetable that can be harvested within a few months. They do well in well-tilled, fertile soil.

5. Zucchini – This summer squash grows rapidly and produces an abundant harvest when planted in spring.

6. Cucumber – A warm-season vegetable, cucumbers thrive when planted in April, ensuring a productive yield in summer.

7. Garlic – Typically planted in fall, garlic can also be planted in early spring for a late summer harvest.

8. Sweetcorn – If you want fresh corn by mid-summer, start planting your seeds in April.

Fruits to Plant in April

1. Cantaloupe – Also known as muskmelon, cantaloupe enjoys warm weather and thrives when planted in well-drained soil with full sun.

2. Rhubarb – A perennial favorite, rhubarb should be planted in early spring to establish strong roots before summer.

Flowers to Plant in April

1. Poppy – These vibrant flowers add beauty to any garden and are easy to grow from seeds in well-drained soil.

Tips for Successful April Planting

Check your frost dates: If your area still experiences late frosts, consider starting seeds indoors before transferring them outside.

Ensure good soil preparation: Enrich your soil with compost or organic matter to provide essential nutrients.

Water adequately: While April brings rain, ensure consistent watering for crops that require more moisture.

Use mulch: Mulch helps retain soil moisture and prevents weeds from taking over.

By following these guidelines and planting the right crops in April, you can set the foundation for a productive and beautiful garden.
𝘽𝙚𝙮𝙤𝙣𝙙 𝙩𝙝𝙚 𝙋𝙡𝙖𝙩𝙚 — 𝙁𝙧𝙪𝙞𝙩𝙨 𝙃𝙞𝙜𝙝 𝙞𝙣 𝙈𝙖𝙜𝙣𝙚𝙨𝙞𝙪𝙢
Magnesium is one of the most common deficiencies in midlife women — impacting sleep, stress, hormones, energy, and digestion. Luckily, you don’t always need a supplement — some fruits offer a sweet solution.

Here are 8 magnesium-rich fruits (plus what else comes with them):

① Dried figs
➤ 68 mg magnesium per 100g
➤ 48g sugar — very high
✔ Powerful for digestion and calcium absorption
⚠️ Use sparingly or pair with protein/fat to buffer sugar

② Jackfruit
➤ 29 mg magnesium per cup
➤ 28g sugar
✔ High in vitamin C, fiber, and immune-boosting benefits
⚠️ Enjoy in small amounts due to high sugar load

③ Avocado
➤ 58 mg magnesium per medium avocado
➤ <1g sugar
✔ Best low-sugar fruit for hormone, brain & metabolic health
★ Daily staple!

④ Dried apricots
➤ 40 mg magnesium per 100g
➤ 38g sugar
✔ Rich in iron, potassium, and antioxidants
⚠️ Great occasionally — best soaked or in trail mix

⑤ Passion fruit
➤ 29 mg magnesium per 100g
➤ 11g sugar
✔ Supports skin, gut, and anti-aging — rich in vitamin A & fiber

⑥ Guava
➤ 22 mg magnesium per 100g
➤ 5g sugar
✔ Immune-boosting, low GI, gut-loving — excellent daily option

⑦ Papaya
➤ 21 mg magnesium per cup
➤ 11g sugar
✔ Soothes digestion, supports detox pathways, and skin clarity

⑧ Bananas
➤ 32 mg magnesium per medium banana
➤ 14g sugar
✔ Helps ease PMS, stress, and supports sleep — but best when slightly green

📌 𝙈𝙞𝙙𝙡𝙞𝙛𝙚 𝙏𝙞𝙥: Focus on low-sugar, high-fiber fruits like avocado, guava, and papaya daily. Enjoy dried fruits in moderation and always pair with fat or protein.