Tuesday, May 20, 2025

ചെല്ലി നിർമ്മാർജ്ജനം എങ്ങിനെ ....

ചെല്ലി നിർമ്മാർജ്ജനം എങ്ങിനെ ....
.............................................................................

നാളികേര കർഷകരെ സംബന്ധിച്ച് എന്നും ഒരു പേടി സ്വപ്നം ആണ് തെങ്ങിനെ ആക്രമിക്കുന്ന ചെല്ലികൾ ...ചെല്ലിയും , തെങ്ങും ഒരുമിച്ച് വളരില്ല ...ചെല്ലിയെ നശിപ്പിക്കാതെ തെങ്ങുകൾ ഒന്നും തന്നെ വളർത്തിയെടുക്കുവാൻ പറ്റാത്ത അവസ്ഥയിൽ എത്തി കാര്യങ്ങൾ ...അത്രയ്ക്ക് വംശവർദ്ധനവ് ആണ് ചെല്ലികൾക്ക് ഉണ്ടായിക്കൊണ്ടിരിക്കുന്നത് ...അവയെ ഏതെങ്കിലും മാർഗ്ഗത്തിൽ നശിപ്പിച്ചാൽ മാത്രമേ തെങ്ങുകൾ വളർന്ന് കിട്ടുകയുള്ളു ..അല്ലെങ്കിൽ കർഷകരുടെ അധ്വാനം വെറുതെയാകും ...

കൊമ്പൻ ചെല്ലിയാണ് തെങ്ങിനെ ആദ്യവും , നേരിട്ടും ആക്രമിക്കുന്നത് ...വർഷത്തിൽ മുഴുവൻ ഇവയുടെ ആക്രമണം കണ്ടുവരുന്നുണ്ട് എങ്കിലും ..ജൂൺ മുതൽ സെപ്തംബർ വരെയുള്ള മാസങ്ങളിൽ ആണ് ചെല്ലികളുടെ ആക്രമണം തെങ്ങിൽ കൂടുതൽ കണ്ടുവരുന്നത് ...മഴക്കാലത്ത് കർഷകരുടെ ശ്രദ്ധ കുറയുന്നതും ആകാം അതിന് ഒരു കാരണം ....തെങ്ങ് കൂടാതെ പന, ഈന്തപ്പന , പൈനാപ്പിൾ , കരിമ്പ് , എണ്ണപ്പന എന്നിവയെയും ചെല്ലികൾ ആക്രമിക്കുന്നു ...മറ്റ് കീടങ്ങളിൽ നിന്നും വ്യത്യസ്തമായി പൂർണ്ണ വളർച്ചയെത്തിയ കൊമ്പൻ ചെല്ലികൾ ആണ് തെങ്ങിനെ ആക്രമിക്കുന്നത് ...എന്നാൽ ചെമ്പൻ ചെല്ലികൾ തെങ്ങിൽ പ്രവേശിച്ചാൽ അവയുടെ വംശവർദ്ധനവും തെങ്ങിന്റെ ഉള്ളിൽ തന്നെ ആയതിനാൽ അവയുടെ ലാർവകൾ ആണ് തെങ്ങിന്റെ ഉൾഭാഗം പൂർണ്ണമായും ആഹാരം ആക്കുന്നത് ...കൊമ്പൻ ചെല്ലിയുടെ ആക്രമണം കൂമ്പ് ചീയൽ , കൂമ്പ് അഴുകൽ പോലുള്ള രോഗങ്ങൾക്കും ചെമ്പൻ ചെല്ലിക്ക് തെങ്ങിൽ പ്രവേശിക്കുന്നതിനും വഴിയൊരുക്കുന്നു ...

ചെല്ലികളെ നശിപ്പിക്കുവാൻ കർഷകർ പല മാർഗ്ഗങ്ങളും പരീക്ഷിക്കാറുണ്ടെങ്കിലും എല്ലാം താൽക്കാലികം മാത്രമായി അവസാനിക്കുകയാണ് ...ഇപ്പോഴും ചെല്ലികളുടെ ആക്രമണത്തിന് ഒരു കുറവും വന്നിട്ടില്ല ...കൊമ്പൻ ചെല്ലികൾ മുട്ടയിട്ട് വംശവർദ്ധനവ് നടത്തുന്ന ചാണകക്കുഴികൾ, കമ്പോസ്റ്റ് കുഴികൾ , മറ്റ് ജൈവവസ്തുക്കൾ അഴുകുന്ന സ്ഥലങ്ങൾ , ഗ്രോബാഗ് പോലുള്ള സ്ഥലങ്ങളിൽ അതിനുള്ള അവസരം ഉണ്ടാക്കാതിരിക്കുക എന്നതാണ് ആദ്യം ചെയ്യേണ്ടത് ...ഏതെങ്കിലും കീടനാശിനിയോ , മെറ്റാറൈസിയം പച്ചകുമിൾ , ഗ്രീൻ മസ്‌കാർഡൈൻ ഫംഗസ് പോലുള്ളവ ഉപയോഗിച്ചോ ഇവയുടെ പുഴുക്കളെ നശിപ്പിക്കാം ...പൂർണ്ണ വളർച്ചയെത്തിയ ചെല്ലികളെ തെങ്ങിൽ ആക്രമണം നടത്തുന്നതിന് മുൻപായി കെണിയിൽ പെടുത്തി നശിപ്പിക്കുക എന്നതാണ് ഏറ്റവും എളുപ്പത്തിൽ കർഷകർക്ക് ചെയ്യാവുന്ന കാര്യങ്ങൾ ..അതിനായി ചെല്ലികൾക്ക് ഇഷ്‌ടമുള്ള വസ്തുക്കളിൽ തന്നെ വേണം കെണി ഒരുക്കുവാൻ ....

തെങ്ങിന്റെ ഭാഗങ്ങൾ , പൈനാപ്പിൾ , കരിമ്പ് , കള്ള് , ചാണക കുഴമ്പ് , പിണ്ണാക്ക് കുഴമ്പ് , ശർക്കര ലായനി , ആവണക്ക് ലായനി ...ഇതുപോലുള്ള വസ്തുക്കൾ എല്ലാം തിരഞ്ഞെടുക്കാം ...ഇവ ഏതെങ്കിലും ബക്കറ്റ് പോലുള്ള പത്രങ്ങളിൽ തയ്യാറാക്കി അതിൽ രൂക്ഷമായ ഗന്ധം കുറവുള്ള കീടനാശിനിയും ചെറിയ അളവിൽ ചേർക്കുക ...മധുരമുള്ള വസ്തുക്കളിൽ കെണി ഒരുക്കുമ്പോൾ തേനീച്ച , കരിവണ്ട് പോലുള്ള മിത്ര ജീവികളും കെണിയിൽ അകപ്പെടുവാൻ സാധ്യതയുണ്ട് ..അതിൽ ഒരു ശ്രദ്ധ വേണം ...ഈ വസ്തുക്കൾ കൊണ്ട് ഉണ്ടാക്കുന്ന കെണി മഴ നനയാതെ വേണം തെങ്ങിൽ തോപ്പിൽ സ്ഥാപിക്കുവാൻ ...ഒരു മാസത്തിന് അടുത്ത് ഇത് ഉപയോഗിക്കുവാനും കഴിയും ...ചെമ്പൻ ചെല്ലിക്ക് കള്ള് പോലുള്ള വസ്തുക്കളോട് ആണ് പ്രിയം കൂടുതൽ ...ഫിറമോൺ കെണികൾ ചെല്ലികളെ നശിപ്പിക്കുവാൻ നല്ലത് ആണെങ്കിലും ഒന്നോ രണ്ടോ ആളുകൾ മാത്രം അത് ഉപയോഗിച്ചാൽ ഗുണത്തേക്കാൾ ഏറെ ദോഷം ആയിരിക്കും ഫലം ...ഒരു പ്രദേശത്ത് ഒന്നാകെ ഫിറമോൺ കെണികൾ സ്ഥാപിച്ച് ചെല്ലികളുടെ ഒരു കൂട്ടക്കുരുതി ആണ് വേണ്ടത് ..അതിനായി സർക്കാർ സംവിധാനങ്ങൾ ഉണർന്ന് പ്രവർത്തിക്കുകയും വേണം ....

തെങ്ങിൽ ഉടക്ക് വല ഇടുന്നതും , പാറ്റാഗുളിക , വേപ്പിൻപിണ്ണാക്ക് , മരോട്ടിപിണ്ണാക്ക് , ചുക്ക , കായം, പെട്രോളിയം ഉത്പന്നങ്ങൾ , മീൻവെസ്റ്റ് , മറ്റ് രൂക്ഷമായ ഗന്ധമുള്ള വസ്തുക്കളും , കീടനാശിനിയും ഒക്കെ തെങ്ങിന്റെ കവിളിലും , മണ്ടയിലും ഒക്കെ വയ്ക്കുന്നതും ചെല്ലികളെ തെങ്ങിൽ നിന്നും അകറ്റും എങ്കിലും ..അവയുടെ ഗുണം നഷ്ടപ്പെടുന്നത് അനുസരിച്ച് പുതിയത് മാറ്റി സ്ഥാപിക്കണം ...ഉടക്ക് വല തെങ്ങിൽ പൊതിയുന്നത് നല്ലൊരു മാർഗ്ഗം ആണ് ....തെങ്ങിന്റെ കവിളിൽ മണലും തരി രൂപത്തിൽ ഉള്ള ഏതെങ്കിലും കീടനാശിനിയും മിക്സ് ചെയ്‌ത്‌ ഇടുന്നതും കൊമ്പൻ ചെല്ലികളെ നിയന്ത്രിക്കുന്നത് നല്ലതാണ് .. .തെങ്ങിനെ ആക്രമിക്കുന്നതിന് മുൻപ് തന്നെ ചെല്ലികളെ ഏതെങ്കിലും മാർഗ്ഗത്തിൽ നശിപ്പിക്കുവാൻ കഴിഞ്ഞാൽ അതായിരിക്കും ഏറ്റവും ഗുണകരവും , എളുപ്പവും ഉള്ള കാര്യം ....നോട്ടത്തിൽ പകുതി നേട്ടം എന്ന് പറയുന്നത് പോലെ ...നിത്യമായ പരിചരണം തന്നെയാണ് തെങ്ങിന്റെ കാര്യത്തിൽ വേണ്ടത് ...WCT പോലുള്ള നാടൻ തെങ്ങുകളെ ഒരു അഞ്ച് വർഷം എങ്കിലും നല്ല പരിപാലനം കൊടുത്ത് വളർത്തുവാൻ കഴിഞ്ഞാൽ പിന്നീട് കാര്യമായി പേടിക്കേണ്ടതില്ല ...എന്നാൽ കുള്ളൻ , ഹൈബ്രീഡ് തെങ്ങുകൾക്ക് എല്ലാ സമയത്തും നല്ല പരിപാലനം ആവശ്യം ഉണ്ട് ...

onnyapppam

ഇതാണ് ഒർജിനൽ ഉണ്ണിയപ്പത്തിന്റെ രഹസ്യ കൂട്ട്! ദിവസങ്ങളോളം കേടുവരാത്ത സോഫ്റ്റ് ഉണ്ണിയപ്പം ഇതുപോലെ ഉണ്ടാക്കി നോക്കൂ! 10 മിനിറ്റിൽ സോഫ്റ്റ് ഉണ്ണിയപ്പം റെഡി!! | Kerala Style Perfect Unniyappam Recipe

ഇതാണ് ഉണ്ണിയപ്പത്തിന്റെ യഥാർത്ഥ രഹസ്യ കൂട്ട്. ഉണ്ണിയപ്പത്തിന്റെ മധുരം ഇഷ്ടമില്ലാത്തവരായി ആരാണുള്ളത്. എന്നാൽ പലർക്കും ഇത് സോഫ്റ്റ് ആയി കിട്ടാറില്ല. ഉണ്ണിയപ്പത്തിന്റെ മധുരം ഇഷ്ടപ്പെടുന്നവർക്ക് വീട്ടിൽ തന്നെ തയ്യാറാക്കാം നല്ലൊരു സ്വാദുള്ള ഉണ്ണിയപ്പം. നമ്മൾ കേരളീയരുടെ പരമ്പരാഗത പലഹാര രുചിക്കൂട്ടായ ഉണ്ണിയപ്പം യഥാർത്ഥ രുചിയിൽ എങ്ങനെ തയ്യാറാക്കിയെടുക്കാം എന്ന് നോക്കാം.

ശർക്കര - 300 ഗ്രാം
വറുത്ത അരിപൊടി - 1 1/2 കപ്പ്‌
മൈദ - 60 ഗ്രാം
ഗോതമ്പ് പൊടി - 60 ഗ്രാം
റവ - 30 ഗ്രാം
പഴം വരട്ട് - 250 ഗ്രാം

ഉണ്ണിയപ്പം തയ്യാറാക്കാനായി 300 ഗ്രാം ശർക്കര എടുത്ത് അതിലേക്ക് രണ്ട് കപ്പ്‌ വെള്ളം കൂടെ ചേർത്ത് ഉരുക്കാനായി അടുപ്പിലേക്ക് മാറ്റാം. ശർക്കര ഉരുകി വരുമ്പോഴേക്കും ഒരു പാത്രമെടുത്ത് അതിലേക്ക് ഒന്നര കപ്പളവിൽ വറുത്ത അരിപ്പൊടി ചേർത്ത് കൊടുക്കണം. ശേഷം അരിപ്പൊടി ഒട്ടും കട്ടകൾ ഇല്ലാതെ നന്നായി അരിച്ചെടുക്കണം. ശേഷം തയ്യാറാക്കിയ ശർക്കര പാനി എടുത്ത് വെച്ച അരിപ്പൊടിയിലേക്ക് ചൂടോട് കൂടെ ഒഴിച്ച് കൊടുക്കണം. ശേഷം ഇനി ഇത് നല്ലപോലെ ഇളക്കി യോജിപ്പിച്ചെടുക്കണം. ഇതേ മിക്സിലേക്ക് 60 ഗ്രാം മൈദ പൊടിയും 60 ഗ്രാം അളവിൽ ഗോതമ്പ് പൊടിയും കൂടെ തന്നെ 30 ഗ്രാം അളവിൽ റവ കൂടി ചേർത്ത് കൊടുക്കാം. അടുത്തതായി ഇതിലേക്ക് ആവശ്യത്തിന് വെള്ളം കൂടെ ഒഴിച്ച് നന്നായി മിക്സ്‌ ചെയ്തെടുക്കാം. ഇതിലേക്ക് നേരത്തെ തന്നെ തയ്യാറാക്കി വെച്ച പഴം വരട്ട് ചേർത്ത് കൊടുക്കാം.

ശേഷം ഇതെല്ലാം കൂടി നന്നായി മിക്സ്‌ ചെയ്ത് കൊടുക്കണം. ഈ മാവ് കട്ടിയായി വരുകയാണെങ്കിൽ ആവശ്യത്തിന് വെള്ളം ചേർത്ത് മിക്സ്‌ ചെയ്തെടുക്കാവുന്നതാണ്. ശേഷം ഇതിലേക്ക് ഒരു നുള്ള് ഉപ്പും ഒരു ടേബിൾ സ്പൂൺ പഞ്ചസാരയും കാൽ ടീസ്പൂൺ ഏലക്ക പൊടിയും കൂടി ചേർത്ത് നന്നായി ഇളക്കി കൊടുക്കാം. ശേഷം ഒരു ടേബിൾ സ്പൂൺ എള്ളും ഒരു ടേബിൾ സ്പൂൺ നെയ്യ് കൂടി ചേർത്ത് എല്ലാം കൂടി നന്നായി മിക്സ്‌ ചെയ്ത് കൊടുക്കാം. അങ്ങനെ നമ്മുടെ ഉണ്ണിയപ്പത്തിന്റെ മാവ് റെഡി ആയിട്ടുണ്ട്. അടുത്തതായി ഉണ്ണിയപ്പച്ചട്ടി അടുപ്പിൽ വച്ച് ആവശ്യത്തിന് എണ്ണയൊഴിച്ച് കൊടുക്കാം. എണ്ണ ചൂടായി വരുമ്പോൾ മാവ് ഒഴിച്ച് കൊടുത്ത് ഉണ്ണിയപ്പം ചുട്ടെടുക്കാം. സ്വാദിഷ്ടമായ ഉണ്ണിയപ്പം തയ്യാർ. ഇനി നിങ്ങൾക്കും തയ്യാറാക്കി നോക്കാം ദിവസങ്ങളോളം കേടുകൂടാതെ സൂക്ഷിക്കാൻ പറ്റിയ ഒരു അടിപൊളി ഉണ്ണിയപ്പം. കൂടുതൽ വിവരങ്ങൾ ആദ്യ കമെ,ന്റിൽ തന്നെ കൊടുത്തിയിട്ടുണ്ട്. Credit : Anithas Tastycorner

Full Recipe Link 👉 https://youtu.be/gTXHmgqPd-A

©️ ᴄᴏᴘʏʀɪɢʜᴛ ᴅɪꜱᴄʟᴀɪᴍᴇʀ : ᴄʀᴇᴅɪᴛ ᴏᴡɴᴇᴅ ʙʏ ʀᴇꜱᴘᴇᴄᴛɪᴠᴇ ᴄᴏɴᴛᴇɴᴛ ᴄʀᴇᴀᴛᴏʀ ᴏᴡɴᴇʀꜱ (ᴘʟᴇᴀꜱᴇ ᴄᴏɴᴛᴀᴄᴛ ᴄʀᴇᴅɪᴛ ɪꜱꜱᴜᴇꜱ ᴅᴍ ᴍᴇ. ᴡᴇ ᴡɪʟʟ ᴄʟᴇᴀʀ ɪᴛ ɪᴍᴍᴇᴅɪᴀᴛᴇʟʏ )

Monday, May 19, 2025

baking soda

Baking soda is a gardener’s best friend: here are 10 clever uses in the garden.

1. Natural Fungicide: Mix baking soda with water and liquid soap to spray on plants and combat fungal diseases like powdery mildew.

2. Weed Killer: Directly apply baking soda on garden weeds to kill them without harming surrounding plants.

3. Pest Deterrent: A mixture of baking soda and flour can deter pests like cabbage worms and aphids when dusted on plants.

4. Soil Amendment: Baking soda can be used to neutralize overly acidic soil, improving the environment for plant growth.

5. Tomato Sweetener: Sprinkle baking soda around tomato plants to decrease soil acidity, resulting in sweeter tomatoes.

6. Compost Enhancer: Speed up the composting process by making the environment more alkaline with baking soda.

7. Odor Absorber: Neutralize odors in areas like compost bins by sprinkling baking soda.

8. Tool Cleaner: Clean gardening tools by scrubbing them with a baking soda paste to remove dirt and rust.

9. Seed Germination: Enhance seed germination by soaking seeds in a baking soda solution before planting.

10. Ant Repellent: Deter ants by creating barriers with baking soda around plants or ant trails.

liquid fertilizer

Guide to Prepare Liquid Fertilizer at Home
Collect Materials:

Gather plant waste (leaves, grass clippings, etc.).
Add kitchen scraps like vegetable peels, eggshells, and leftover food.
Have a large plastic drum or container and water ready.
Preparation:

Fill the drum halfway with organic waste.
Add enough water to submerge the materials.
Stir the mixture thoroughly.
Fermentation:

Cover the drum loosely to allow airflow.
Place it in a shaded area.
Let it ferment for 2–3 weeks, stirring every few days.
Straining:

After fermentation, strain the liquid using a sieve or cloth.
Collect the liquid fertilizer in bottles.
Application:

Dilute the fertilizer (1 part fertilizer to 10 parts water).
Use it to water plants for healthy growth.

Friday, May 9, 2025

cake

This Flourless Sweet Potato Ginger Cake is a warm, comforting dessert with a perfect balance of spices and natural sweetness from the sweet potato. 🍠🍂✨
It’s gluten-free, moist, and full of rich flavors, making it a great option for those looking for a healthier treat!

Ingredients
For the Cake:

🍠 1 cup (200g) mashed sweet potato (about 1 medium potato, cooked and mashed)

🧑‍🍳 3 large eggs

🍯 ¼ cup (60ml) maple syrup or honey

🧈 ¼ cup (60g) melted coconut oil or butter

🌿 1 tsp vanilla extract

🧁 ½ cup (60g) almond flour (or other gluten-free flour)

🍂 1½ tsp ground ginger

🍪 1 tsp ground cinnamon

🧂 ¼ tsp ground nutmeg

🧁 1 tsp baking soda

Thursday, May 8, 2025

oxygen plants

🌿 6 Plants That Help You Sleep Better Naturally 🌿
💜 1. Lavender
Known for its soothing scent, lavender can:
• Lower heart rate
• Reduce anxiety
• Promote deeper sleep

🪴 Place it near your bed for a gentle, calming aroma.

🌼 2. Jasmine
Sweet and delicate, jasmine:
• Eases anxiety
• Enhances sleep quality
• Boosts daytime alertness

🌙 Perfect for a nightstand or sunny bedroom spot.

🌱 3. Spathiphyllum (Peace Lily)
This elegant plant:
• Removes airborne toxins
• Increases room humidity
• Alleviates dry air symptoms

🌿 Adds tranquility and cleaner air to your sleep space.

🌸 4. Valerian
Valerian has been used for centuries to aid sleep. It:
• Encourages relaxation
• Helps you fall asleep faster
• Gives off a soft, comforting scent

☀️ Thrives best in bright, indirect light.

🌿 5. Mother-in-law’s Tongue (Snake Plant)
This low-maintenance beauty:
• Produces oxygen at night
• Filters harmful pollutants
• Needs minimal care

🛌 The perfect bedside air-purifying companion.

🌼 6. Gardenia
With its lush blooms and dreamy aroma, Gardenia:
• Reduces anxiety
• Encourages restful sleep
• Has a naturally sedative effect

🌙 Ideal for peaceful, spa-like bedroom vibes.

✨ Final Thoughts
Adding even one of these plants to your room can help turn your space into a natural sleep sanctuary.
They don’t just look good—they help you feel good, too. 🌿🛏️💫

avacado

6 Tips for Growing Avocado in a Pot and Getting it to Fruit

1. Choose the Right Variety
Not all avocado varieties are suited for container growing. When selecting a variety, opt for dwarf or semi-dwarf cultivars such as ‘Wurtz,’ ‘Lamb Hass,’ or ‘Holiday.’ These varieties are more compact and easier to manage in pots. They also tend to produce fruit earlier than larger varieties, making them ideal for home gardeners.

2. Start with a Healthy Sapling
Starting with a healthy sapling is crucial. While you can grow an avocado tree from a seed, it’s a slow process and the resulting tree might not produce fruit for many years. Instead, purchase a grafted avocado sapling from a reputable nursery. Grafted trees are more likely to bear fruit and are often more disease-resistant.

3. Use the Right Pot and Soil
Avocado trees need plenty of space for their roots to grow, so choose a large pot with good drainage. A container that’s at least 15-20 gallons in size is a good start. Make sure the pot has drainage holes to prevent waterlogging, which can lead to root rot. Use a well-draining potting mix, such as a blend of sandy soil and compost. Adding some perlite or coarse sand can also improve drainage.

4. Watering Wisely
Proper watering is key to growing a healthy avocado tree. Avocados don’t like to sit in water, so ensure the soil is moist but not soggy. Water the tree thoroughly when the top inch of soil feels dry to the touch. During the hot summer months, you might need to water more frequently, while in cooler seasons, reduce the watering. Overwatering can be as harmful as underwatering, so monitor the soil moisture closely.

5. Provide Adequate Sunlight and Fertilizer
Avocado trees thrive in full sun, needing at least 6-8 hours of direct sunlight daily. Place your pot in a sunny spot, preferably facing south or west. If you’re growing the tree indoors, place it near a bright window and consider using grow lights to supplement natural light.

Feeding your avocado tree is equally important. Use a balanced, slow-release fertilizer designed for fruit trees. Fertilize every 4-6 weeks during the growing season (spring and summer) and reduce feeding in the fall and winter when the tree is dormant. Regular feeding will promote healthy growth and increase the chances of fruit production.

6. Prune and Pollinate
Pruning helps maintain the size and shape of your avocado tree, making it easier to manage in a pot. Trim any dead or damaged branches, and pinch back the tips of new growth to encourage a bushier shape. This not only keeps the tree compact but also promotes better air circulation and light penetration, which are essential for fruiting.

Avocado trees are typically self-pollinating, but having more than one tree can increase the chances of pollination and fruit set. If space is limited and you can only have one tree, consider hand-pollinating by transferring pollen from the male to the female flowers using a small brush. This can significantly improve your chances of getting fruit.

Sunday, May 4, 2025

turmeric

Pour Turmeric on Your Plants and Watch What Happens: The Gardener’s Secret Remedy
Turmeric isn’t just for cooking — it’s a powerful, natural remedy for your garden too! Thanks to curcumin, turmeric fights fungi, pests, and even boosts plant growth.

Why Turmeric Helps Plants:
1. Fights mold and rot (natural fungicide)

2. Repels pests like ants and aphids

3. Heals plant wounds after cuts

4. Boosts soil health for stronger growth

How to Use It:
Mix 1–2 teaspoons of ground turmeric into 4 cups (1 liter) of water.

Stir well to dissolve.

Pour or spray around the base or on affected leaves.

Best Uses:
1. Treat fungal infections

2. Protect seedlings

3. Deter pests

4. Heal pruning wounds

Tips for Success:
Use lightly to avoid staining.

Reapply after heavy rain.

Test on a small area first.

Plants That Love It:
Roses, tomatoes, cucumbers, peppers

Indoor plants like pothos and peace lilies

Final Note:
Next time you spot problems in your garden, skip the chemicals — turmeric is the secret natural fix you’ve been looking for!

soap water


Soap water is a gardener's defense. Here's why
McKayla Davis
Contributing Writer
Gardening enthusiasts are always on the lookout for natural, effective solutions to protect their plants. Soap water has emerged as a versatile tool in the gardener's arsenal, offering a sustainable way to manage pests and promote plant health. This simple yet powerful solution can help maintain a thriving garden without relying on harsh chemicals. In this article, we explore the multifaceted benefits of soap water and how it can be a gardener's best defense.
Understanding the Composition of Soap Water
Soap water is typically made by diluting liquid soap in water. The key ingredient is soap, which is a surfactant that helps break down the protective outer layers of pests. It's important to use pure liquid soap, free from additives like fragrances or moisturizers, which can harm plants. The right balance of soap and water is crucial to ensure effectiveness while minimizing potential harm to plants.
How Soap Water Acts as a Natural Pesticide
Soap water works by disrupting the cell membranes of soft-bodied insects such as aphids, spider mites, and whiteflies. When sprayed on these pests, the soap penetrates their outer shell, leading to dehydration and eventual death. This method is not only effective but also environmentally friendly, as it targets pests without leaving harmful residues.
Benefits of Using Soap Water in the Garden
Using soap water in the garden offers numerous benefits. It is cost-effective, easy to prepare, and reduces the need for chemical pesticides. Additionally, it is safe for most plants and does not harm the environment. Soap water can also be used to clean plant leaves, removing dust and debris that can hinder photosynthesis.
Safety Considerations When Using Soap Water
While soap water is generally safe, it's important to test it on a small area of the plant first to ensure there is no adverse reaction. Avoid using soap water on plants with hairy or waxy leaves, as it can cause damage. Always apply soap water in the early morning or late afternoon to prevent sunburn on wet leaves.
Top 12 Viral Tips for Using Soap Water in Gardening
To maximize the benefits of soap water, gardeners can follow these viral tips that have been shared and tested by gardening communities worldwide.
Tip 1: Creating the Perfect Soap Water Solution
Mix 1 tablespoon of liquid soap (like castile or dish soap without degreasers) with 1 quart of water. This concentration breaks down the protective outer layer (cuticle) of soft-bodied insects, leading to dehydration and death, while remaining gentle on plant tissue when used correctly.
Tip 2: Targeting Aphids with Soap Water
Aphids have soft, waxy exoskeletons that are easily disrupted by the fatty acids in soap. Spray the soap water directly onto colonies, focusing on leaf undersides where aphids cluster. The soap penetrates their outer layer, causing cell collapse and suffocation.
Advertisement
Tip 3: Combating Spider Mites Effectively
Spider mites thrive in hot, dry environments and reproduce rapidly. Soap water disrupts their webbing and egg-laying surfaces while dissolving their protective cuticle. Regular spraying interrupts their breeding cycle and prevents outbreaks.
Tip 4: Soap Water for Fungal Control
Though not a fungicide, soap water can help physically dislodge fungal spores from plant surfaces. The surfactant action helps wash away early-stage mildew or mold, making it harder for spores to establish colonies, especially when combined with proper airflow and sunlight.
Tip 5: Using Soap Water on Edible Plants
Soap water is generally safe on fruits and vegetables, but always rinse thoroughly before eating. The soap loosens dirt and pests but leaves a residue that can affect flavor or cause mild digestive issues if not washed off.
Tip 6: Enhancing Soil Health with Soap Water
When used occasionally, soap water can help break up compacted soil due to its surfactant properties. This temporarily reduces surface tension, improving water penetration and oxygen flow. However, excessive use can harm beneficial microbes, so use sparingly.
Advertisement
Tip 7: Soap Water for Weed Management
Soap weakens the waxy protective layer on young weed leaves, making them more vulnerable to dehydration and physical removal. It's not a standalone herbicide but softens up weeds for easier pulling or combo treatment with vinegar or mulch.
Tip 8: Protecting Beneficial Insects
To avoid harming pollinators and helpful predators like ladybugs, spray only where pests are visible and avoid flowering parts of plants. Timing and targeting prevent collateral damage to the garden’s natural pest control allies.
Tip 9: Frequency and Timing of Application
Apply soap water once weekly or as needed during infestations. Early morning or late afternoon is best to prevent soap-sun interaction that can scorch leaves. Monitor plants for stress to adjust frequency or concentration.
Tip 10: Combining Soap Water with Other Natural Remedies
For a broader defense, mix soap water with neem oil, which acts as an insect growth regulator, or garlic spray, which repels pests. Soap enhances adherence and coverage, allowing active ingredients to stick better to pests and foliage.
Advertisement
Tip 11: Storing and Reusing Soap Water Solutions
Store unused solution in a labeled spray bottle in a cool, dark place. Shake before each use to re-mix the soap, which may separate over time. Discard after a week or two, as soap can degrade and lose effectiveness.
Tip 12: Troubleshooting Common Issues
If plants show curling, browning, or spotting after use, rinse immediately with clean water. These may be signs of sensitivity. Try lowering the soap concentration or switching to a milder soap (like castile) to avoid phytotoxicity.
Conclusion: Embracing Soap Water as a Gardener's Ally
Soap water is a versatile and effective tool for gardeners seeking natural solutions. By understanding its benefits and proper application techniques, gardeners can protect their plants while promoting a healthy, sustainable garden environment.

crop rotation

Crop rotation plan 🌱🍅 🥕🌽 for a vegetable garden for four years, with four sections: leaves 🥬, fruits 🍅, roots 🥕 and legumes 🌿.
This technique is the key to sustainable agriculture 🛠️🌍, helping to maintain soil health and productivity.
🌟 Benefits of crop rotation:
1. Conservation of nutrients 🪴: alternating crops prevents the soil from becoming depleted because each plant uses different nutrients.
2. Pest and disease control 🐛🚫: interrupt the life cycle of pests specific to each crop.
3. Soil improvement 🌾✨: Legumes fix nitrogen, enriching the soil.
4. Varied production 🥗: Ensures the harvest of different foods each season.
🌱 How to apply it:
• Year 1: Leaves 🥬, fruits 🍅, roots 🥕 and legumes 🌿 in their sections.
• Year 2: rotate crops to the next section.
• Years 3 and 4: Continue the cycle until all rotations are completed.

House plants

🚫🐱 Cat Lovers, Take Note!
Some common houseplants can be harmful to your furry friends! Here’s a quick guide to plants you should keep away from curious kitties:

❌ Begonia – Causes mouth irritation and drooling
❌ Aloes – Toxic to cats, can lead to vomiting and lethargy
❌ Dieffenbachia (Dumb Cane) – Can cause oral irritation and difficulty swallowing

❌ Aglaonema (Chinese Evergreen) – Irritating to mouth and stomach
❌ Chives – Part of the allium family; can lead to anemia
❌ Monstera – Contains insoluble calcium oxalates, causes irritation if chewed

❌ Dracaena – May lead to vomiting, loss of appetite, and drooling
❌ Sansevieria (Snake Plant) – Mildly toxic, can cause nausea and vomiting
❌ Grubosz (Jade Plant) – Toxic to cats, may cause vomiting and incoordination

🌿✨ Always check a plant's safety before bringing it home to your feline friend. A beautiful space and a safe one is the purrfect combo!

Friday, May 2, 2025

immunity

🛡️ 15 Powerful Foods That Boost Your Immune System Naturally 🌿🍽️
🍊 1. Citrus Fruits
Packed with vitamin C, citrus fruits like oranges, lemons, and limes increase white blood cell production—vital for fighting infections.

🥦 2. Broccoli
Rich in vitamins A, C, and E, as well as fiber and antioxidants, broccoli is one of the healthiest vegetables to include in your meals.

🧄 3. Garlic
Garlic contains allicin, a compound that enhances immune function and helps fight infections.

🍠 4. Sweet Potatoes
Loaded with beta-carotene, sweet potatoes support skin health—which is your body’s first line of defense.

🥣 5. Yogurt
Probiotics in yogurt promote gut health, which is closely linked to immune strength.

🎃 6. Pumpkin Seeds
High in zinc, these seeds help immune cells function properly and can help reduce inflammation.

🥚 7. Eggs
A great source of protein and vitamin D—both important for immune function.

🍄 8. Mushrooms
Mushrooms like shiitake and maitake are known for boosting white blood cells and enhancing immunity.

🌶️ 9. Peppers
Bell peppers are rich in vitamin C—yes, even more than citrus fruits! They also contain beta-carotene for added support.

🍈 10. Papaya
Papaya contains digestive enzymes and vitamin C, both of which help strengthen the immune system.

🥕 11. Carrots
Another great source of beta-carotene that supports mucous membrane health and immune defense.

🥬 12. Dark Greens
Spinach, kale, and other leafy greens are loaded with immune-enhancing nutrients like folate and iron.

🌱 13. Ginger
Ginger has anti-inflammatory and antioxidant properties, helping fight off illness and soothe sore throats.

🥣 14. Lentils
A plant-based source of protein, iron, and zinc, lentils help energize your immune response.

🍊 15. Citrus Fruits (Again!)
They're so important they deserve a second mention! Vitamin C is essential for cellular repair and defense.

🌟 Final Thoughts
Including these 15 foods in your diet will help your body stay resilient, energetic, and ready to defend itself. Combine them with proper sleep, hydration, and exercise, and you'll give your immune system everything it needs to thrive.

mucus reducing Foods

🫁 Clear Your Airways Naturally: Mucus-Reducing Foods
Struggling with congestion or heavy mucus? These natural foods can help clear your airways and make breathing easier.

🌿 Mucus-Reducing Foods:
🧅 Onions – Break down mucus and support your lungs.

🌿 Tulsi (Holy Basil) – Thins mucus and boosts immunity.

🥬 Daikon & Radish – Natural decongestants for clear sinuses.

🍋 Lemon Zest – Fights mucus and strengthens your immune system.

🫚 Ginger – Calms airways and reduces mucus.

🧂 Black Pepper – Opens up nasal passages.

🌱 Basil & Thyme – Help your body expel mucus faster.

🍊 Orange Peel – Eases congestion naturally.

🧄 Garlic – Fights infections and clears mucus.

🌰 Nigella Seeds/Oil – Supports respiratory health.

🌿 Mint – Menthol opens up airways.

🌾 Mustard Seeds – Stimulate mucus removal.

🍎 Apple Cider Vinegar – Thins mucus and balances your system.

✅ Quick Usage Tips:
Brew teas with tulsi, thyme, or mint.

Add lemon zest, garlic, or ginger to your meals.

Drink apple cider vinegar with warm water and honey.

💨 Breathe Better, Feel Better
Add these powerful ingredients to your daily routine to naturally reduce mucus and support your respiratory system. Simple, natural, and effective!

Thursday, May 1, 2025

fruit fly

പച്ചക്കറി #കൃഷിയിൽ #വെള്ളീച്ചയുടെ ശല്യം തുടങ്ങി കഴിഞ്ഞാൽ അവയെ നിയന്ത്രിക്കാൻ താഴെപ്പറയുന്ന കാര്യങ്ങൾ ചെയ്യാവുന്നതാണ്:

* ബാധിച്ച ഇലകൾ നീക്കം ചെയ്യുക:
 വെള്ളീച്ചകൾ കൂട്ടമായി കാണുന്നതും മുട്ടയിട്ടിരിക്കുന്നതുമായ ഇലകൾ ശ്രദ്ധാപൂർവ്വം നീക്കം ചെയ്ത് നശിപ്പിക്കുക. ഇത് വെള്ളീച്ചയുടെ വ്യാപനം ഒരു പരിധി വരെ തടയും.

 * മഞ്ഞക്കെണി സ്ഥാപിക്കുക: മഞ്ഞ നിറത്തിലുള്ള പശയുള്ള കെണികൾ ചെടികൾക്കിടയിൽ സ്ഥാപിക്കുക. വെള്ളീച്ചകൾ ഈ നിറത്തിൽ ആകർഷിക്കപ്പെടുകയും കെണിയിൽ ഒട്ടിപ്പിടിച്ച് നശിക്കുകയും ചെയ്യും.

ശക്തമായ ജലധാര: ചെടികളിൽ ശക്തമായ ജലധാര ഉപയോഗിച്ച് കഴുകുന്നത് വെള്ളീച്ചകളെയും അവയുടെ മുട്ടകളെയും ഇലകളിൽ നിന്ന് നീക്കം ചെയ്യാൻ സഹായിക്കും. ഇത് രാവിലെ അല്ലെങ്കിൽ വൈകുന്നേരം ചെയ്യുക.

* ജൈവ കീടനാശിനികൾ ഉപയോഗിക്കുക:
   * വേപ്പെണ്ണ: 5 ml വേപ്പെണ്ണ ഒരു ലിറ്റർ വെള്ളത്തിൽ കലക്കി ഇലകളുടെ അടിയിലും മുകളിലും നന്നായി തളിക്കുക. ആഴ്ചയിൽ രണ്ടോ മൂന്നോ തവണ ഇത് ആവർത്തിക്കുക.

   * സോപ്പ് ലായനി: വീര്യമില്ലാത്ത സോപ്പ് ലായനി (ഒരു ലിറ്റർ വെള്ളത്തിൽ 5 ഗ്രാം എന്ന അളവിൽ) തളിക്കുന്നത് വെള്ളീച്ചകളുടെ പുറം പാളി നശിപ്പിക്കാൻ സഹായിക്കും.

   * വെളുത്തുള്ളി-കാന്താരി മിശ്രിതം: വെളുത്തുള്ളിയും കാന്താരിയും അരച്ച് വെള്ളത്തിൽ കലർത്തി നേർപ്പിച്ച് തളിക്കുന്നത് വെള്ളീച്ചകളെ അകറ്റാൻ സഹായിക്കും.

* രാസ കീടനാശിനികൾ (അവസാന മാർഗ്ഗം): ജൈവ രീതികൾ ഫലപ്രദമല്ലാത്ത സാഹചര്യങ്ങളിൽ മാത്രം രാസ കീടനാശിനികൾ ഉപയോഗിക്കുക.
   * ഇമിഡാക്ലോപ്രിഡ് (Imidacloprid), തയോമെതോക്സാം (Thiamethoxam), അസെറ്റാമിപ്രിഡ് (Acetamiprid) പോലുള്ള മരുന്നുകൾ നിർദ്ദേശാനുസരണം ഉപയോഗിക്കാം.
   * രാസ മരുന്നുകൾ ഉപയോഗിക്കുമ്പോൾ സുരക്ഷാ മുൻകരുതലുകൾ എടുക്കുകയും വിളവെടുപ്പിന് ശേഷമുള്ള സമയം ശ്രദ്ധിക്കുകയും ചെയ്യുക. ഒരേ മരുന്ന് തന്നെ തുടർച്ചയായി ഉപയോഗിക്കാതിരിക്കാൻ ശ്രദ്ധിക്കുക.
ശ്രദ്ധിക്കേണ്ട കാര്യങ്ങൾ:
 * മരുന്ന് തളിക്കുമ്പോൾ ഇലകളുടെ അടിവശത്തും തണ്ടുകളിലും നന്നായി എത്തുന്നെന്ന് ഉറപ്പാക്കുക.
 * രാവിലെ അല്ലെങ്കിൽ വൈകുന്നേരം തണുപ്പുള്ള സമയത്ത് മരുന്ന് തളിക്കാൻ ശ്രമിക്കുക.
 * രോഗബാധയുടെ തീവ്രത അനുസരിച്ച് മരുന്നുകളുടെ അളവിലും തളിക്കുന്ന ഇടവേളകളിലും മാറ്റം വരുത്താം.
 * പ്രതിരോധ നടപടികൾ തുടർച്ചയായി ചെയ്യുക, വെള്ളീച്ച പൂർണ്ണമായും നശിച്ചു എന്ന് ഉറപ്പാക്കുന്നത് വരെ ഇത് തുടരണം.
#sarathkavanal #lifefunmaker #whiteflycontrol
Simple kitchen items can transform your garden into a thriving, healthy space—without spending a fortune! 💡🌱

🔧 Here are easy and natural garden hacks:
🥚 Calcium for Plants = Boiled Egg Water
Great for strengthening stems and preventing blossom end rot.
☕ Improve Soil = Used Coffee Grounds
Adds nitrogen and improves soil structure.
🍚 Healthy Roots = Rice Water
Feeds beneficial microbes and promotes strong root development.
💧 Save Dying Plants = Hydrogen Peroxide
Oxygenates roots and fights root rot.
🧂 Weed Killer = Baking Soda
Sprinkle in cracks to eliminate unwanted weeds.
🌿 Plant Pest Spray = Neem Oil
A natural solution for aphids, mites, and fungal issues.
🍌 Plant Fertilizer = Banana Peel
Rich in potassium and phosphorus for better flowering and fruiting.
🍯 Regrow Roses = Honey
Acts as a natural rooting hormone for cuttings.
🧂 Boost Magnesium = Epsom Salt
Improves photosynthesis and fruit production.
🥚 Seed Starter = Eggshells
Biodegradable, calcium-rich containers for seedlings.

🌟 These DIY tricks are perfect for organic, budget-friendly gardening!

വീട്ടിൽ ആക്രി പാട്ട ഉണ്ടോ??

വീട്ടിൽ ആക്രി പാട്ട ഉണ്ടോ?? കൊച്ചുള്ളി പറിച്ചു മടുക്കും…ഒരു പാട്ട മാത്രം മതി ഈ സൂത്രം ചെയ്യാൻ
.
.
ആവശ്യമായ കാര്യങ്ങൾ എന്തെല്ലാമാണെന്ന് വിശദമായി മനസ്സിലാക്കാം. ചെറിയ ഉള്ളി മുളപ്പിച്ചെടുക്കാനായി ആദ്യം തന്നെ ഒരു വലിയ ബക്കറ്റ് ആവശ്യമാണ്. വീട്ടിൽ ഉപയോഗിക്കാതെ ഇരിക്കുന്ന സ്റ്റീൽ ബക്കറ്റുകൾ ഉണ്ടെങ്കിൽ അതുതന്നെ തിരഞ്ഞെടുക്കാം. ശേഷം എന്ത് ചെയ്യണം ,അറിയാം വീഡിയോ കണ്ടാൽ എല്ലാം അറിയാൻ സാധിക്കും 
വീഡിയോ കാണൂ : https://bitl.to/4Jyu

Onion cultivation involves several methods to ensure optimal growth and production. Here are some common methods:

Soil and Climate
1. *Well-draining soil*: Onions prefer well-draining, fertile soil with a pH range of 6.0-7.0.
2. *Cool weather*: Onions thrive in cool weather, with temperatures between 15-25°C (59-77°F).

Propagation
1. *Seeds*: Onions can be propagated through seeds, which are sown in nurseries and then transplanted to fields.
2. *Sets*: Onions can also be propagated through sets, which are small, immature onions that are planted in the ground.

Planting
1. *Spacing*: Onions are typically spaced 10-15 cm (4-6 inches) apart to allow for good air circulation and sunlight penetration.
2. *Depth*: Onions are planted 1-2 cm (0.4-0.8 inches) deep, with the top of the bulb level with the soil surface.

Irrigation
1. *Regular watering*: Onions require regular watering, especially during the growing stage.
2. *Drip irrigation*: Drip irrigation is a common method used to deliver water directly to the roots of the plants.

Fertilization
1. *Organic fertilizers*: Organic fertilizers, such as compost or manure, are often used to promote healthy plant growth.
2. *Inorganic fertilizers*: Inorganic fertilizers, such as nitrogen, phosphorus, and potassium, can also be used to promote plant growth.

Pest and Disease Management
1. *Integrated pest management*: Integrated pest management (IPM) strategies are used to manage pests and diseases, including the use of natural predators, biological control agents, and cultural practices.
2. *Chemical control*: Chemical control methods, such as pesticides and fungicides, can be used to manage pests and diseases, but should be used judiciously to avoid harming the environment and human health.

Harvesting
1. *Maturation*: Onions are typically harvested when the tops have yellowed and fallen over.
2. *Curing*: Onions are cured in a warm, dry place to promote drying and improve storage life

#Krishi #agriculture

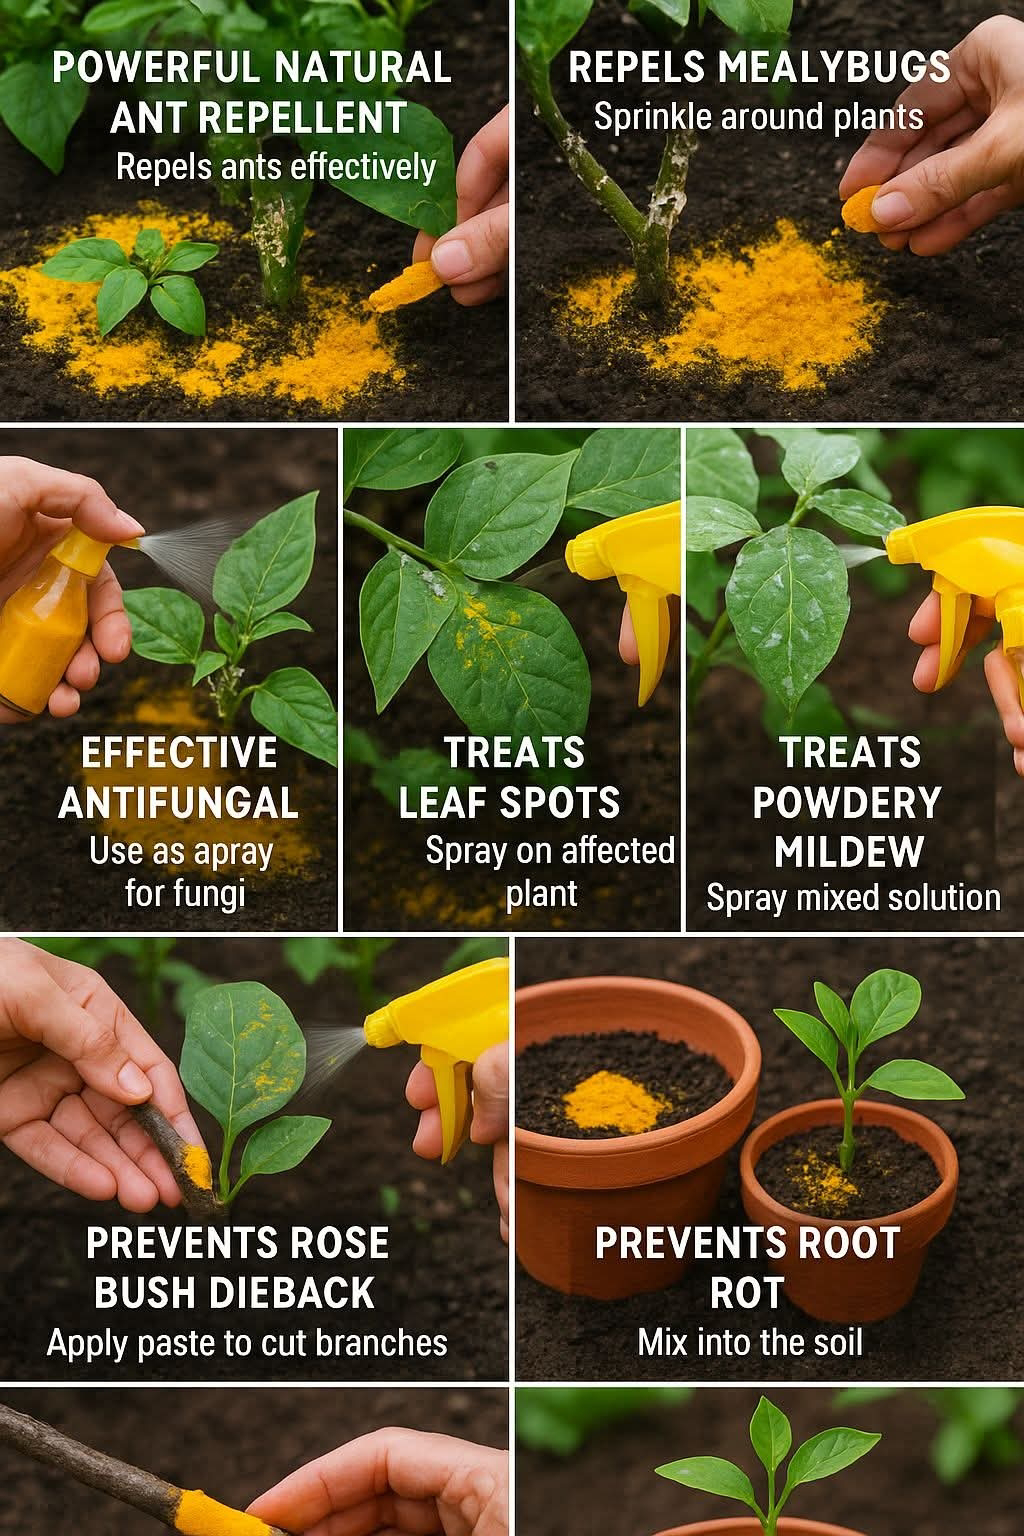
turmeric

Pour Turmeric on Your Plants and Watch What Happens: The Gardener’s Secret Remedy


Today, I’m sharing 10 surprising uses of turmeric for your plants. This spice is not only great in cooking but also in the garden. I typically use it alone, either as a powder or spray, but sometimes combine it with other natural ingredients for even more powerful effects. Avoiding chemical pesticides and fertilizers is crucial for a healthy garden, and turmeric offers a natural, effective alternative. Here are 10 ways you can use turmeric to benefit your plants:

1. Powerful Natural Ant Repellent
Ants can be a nuisance in the garden, but turmeric’s smell drives them away.
How to Use:
Sprinkle turmeric powder around your plants and on the soil surface. Use sparingly, as a little goes a long way.

2. Repels Mealybugs
By repelling ants, you also deter mealybugs, as ants protect these pests for their honeydew.
How to Use:
Sprinkle turmeric powder around your plants to repel both ants and mealybugs.

3. Natural Pesticide
Turmeric is an effective repellent against various garden pests, including cabbage looper larvae and gray worm larvae.
How to Use:
Sprinkle turmeric powder around the base of affected plants.

4. Effective Antifungal
Turmeric’s antifungal properties help combat plant diseases caused by fungi.
How to Use:
Mix 2 teaspoons of turmeric powder in 1 liter of water.
Pour the mixture into a spray bottle and spray on affected plants.

5. Treats Leaf Spots
For black spots on leaves, turmeric spray is very effective.
How to Use:
Mix 2 teaspoons of turmeric powder in 1 liter of water.
Spray the mixture on the leaves of the affected plant.

6. Treats Powdery Mildew
To combat powdery mildew, combine turmeric with other natural ingredients.
How to Use:
Mix 2 teaspoons of turmeric powder, 100 ml of milk, and 2 teaspoons of white vinegar in 1 liter of water.
Spray this mixture on the leaves and stems of the affected plant.

7. Prevents Rose Bush Dieback
To prevent dieback in rose bushes, use a turmeric paste on cut branches.
How to Use:
Prepare a thick paste using water and turmeric powder.
Apply the paste to the cut wound on the branch.

8. Prevents Root Rot
Mixing turmeric into the soil can prevent root rot.
How to Use:
For potted plants, mix 1 tablespoon of turmeric per 5 liters of potting soil.
For in-ground plants, water with a mixture of 1 teaspoon of turmeric in 1 liter of water.

9. Heals Plant Wounds
Turmeric’s antiseptic properties help heal plant injuries.
How to Use:
Prepare a paste of water and turmeric powder.
Apply the paste to the plant wound and cover with grafting tape if possible.

10. Promotes Root Development
Turmeric acts similarly to rooting hormones, stimulating root growth in cuttings.
How to Use:
Add 1 tablespoon of turmeric to the potting soil when planting cuttings.
By incorporating these simple turmeric-based remedies, you can maintain a healthy, pest-free garden naturally.